 |
Camshafts, shims and that tapping noise. |
 |
|
Camshafts, shims and that tapping noise. |
|
When I installed my custom grind exhaust camshafts back in 2002, the only way to do it was to take them out, send them away to be welded, grinded and reinstall with a full set of thicker shims. These welded camshafts are still performing satisfactorily in my engine after 75 000 km (46 000 miles) - this is longer than expected. I have not been able to detect any wear using a feeler gauge, visual inspection and engine oil analysis. Here are the old pages writing about this:
2002 CAMSHAFT PAGES:
 |
1. 1UZ-FE V8 Exhaust Camshafts - Theory Dyno 2000 computer model of changing the exhaust cam profile from 21st Century Performance. |
 |
2. 1UZ-FE V8 Exhaust Camshafts - Practice Removing the exhaust cams and shimming the intake valves. Now with pictures. |
 |
3. 1UZ-FE V8 Exhaust Camshafts - Installation The cams are back |
The results for me weren't cut and dry. I didn't get a specific before and after dyno run. The results were more incremental and mild rather than outstanding. It would appear from the dyno library that my exhaust cams made my car competitive with regards to top end power whereas before it regularly came last against other Soarers. My UZZ32 has an engine driven oil suspension pump that would seem to drain power. It is common to find UZZ32's at the bottom of any dyno comparision well behind similar spec UZZ31 and UZZ30 V8 Soarers. With the installation of the headers and tuning, the cams may now be realising their full potential. I can only estimate that the cams I installed are responsible for approx 6-12 rwkW.
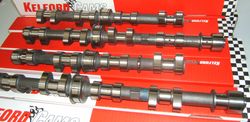
Nowadays their are several companies selling billet cams - you can buy them outright and leave your stock cams alone. The base cirlce is similar to stock cams so the shims needed for installation are the common garden variety - not the special order thick shims I had to get from Japan. Cams are available in so many grinds and are now dyno proven. A tremendous advance. Considering typical labour costs of $300 to $600 to address shim adjustment, I would be tempted to install some "hot" cams at the same time as changing shims.
 |
http://www.kelford.co.nz/ Kelford
sell a set of all four cams for $1800 NZ ($1670Aud) plus around $120NZ postage to
Australia. Cams for turbo, supercharged, street and race 1UZ-FE V8s: http://www.camshaftshop.com/camshafts/view/27/toyota-camshaft/ These guys look to have it all. |
 |
http://www.crowcams.com.au/index.shtml information unknown |
 |
http://www.tighecams.com.au/index.htm information unknown |
Some older cars have a single camshaft that pushes a lifter (can be an hydraulic tappet) that pushes a pushrod that pushes a rocker that pushes the valve down. These hydraulic lifters wore out and a "tappet noise" occurs. Also referred to as "lifters are gone" . The Toyota 1UZ-FE has 4 camshafts that live directly above the valves. There are coin shaped shims held by buckets that press directly on top of the valves. These shims can wear against the camshafts and the gap between the two can get big enough to make a tapping or loud ticking noise. This noise is not to be confused with the gentle ticking of the injectors working. If a ticking or tapping noise can be heard from inside the cabin while driving it's the camshaft lobes gently tapping against the shims as the valves open and shut.
The noise can be eliminated buy firstly measuring the gaps between the camshaft lobes and the shims, and identifying where the gaps are too large. Then the shim is removed and replaced with a thicker shim so that the gap is correct and the noise goes away. A tapping noise on the 1UZ-FE is usually because of a couple of worn shims. The shims are about $12-$15 Aud each - but the labour involved to fix a common noise can run around 6 hours depending on how many shims are needed to be replaced. Special tools are best used for the job. A workshop manual is a must - there are many things that can go wrong! Dropping a shim down the wrong hole in the head would be most painful.
I have the correct Toyota tools to depress and hold the bucket so that the shim can be replaced without removing the camshaft. It makes the job so much easier than remvoing the camshafts. Back in November 2004 I finally got around to changing a couple of shims on my engine. The tapping noise had been there since the camshaft install. Here is a couple of pics of how it all went.
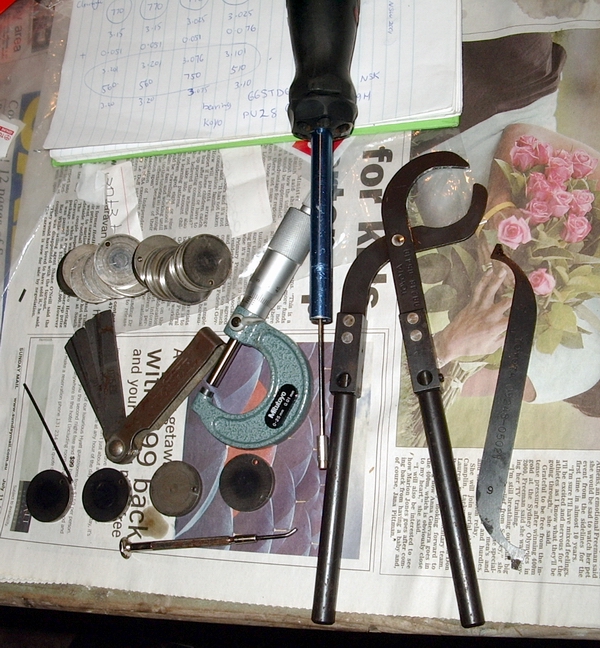
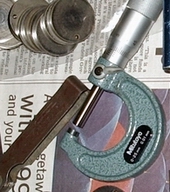
The Toyota tools are on the right. The pincer looking things go around the camshaft, then rotate and press on the edge of the bucket moving the valve down. The thin tool on the right then holds the edge of the bucket down leaving just enough room to pluck out the shim. I still use the bent screw driver to pluck out a shim rather than compressed air. I use the feeler gauge to determine where the gaps are too big. A gap that is too big means the shim is too thin and out it comes. I then measure the thickness of the shim super accurately with an expensive micrometer to determine its thickness and work how much thicker it needs to be. If I don't have the shim in stock I order one and get it the next day or two and pop it back in and re-measure the gap. Gaps I aim for are 0.2mm (8 thou) intake and 0.3mm (12 thou) exhaust. The screwdriver with the magnet tip is for getting the shim out of there once it's plucked out. The shims are sort of sucked in place with an oil film and can be difficult to remove - they rotate freely but resist lifting out. It's sort of like a small version of when you flip your car at the beach in the wet sand and the roof is "sucked" to the ground and makes a popping sound when the front end loader lifts it out the next day after it's been there all night with the tide coming in and filling the inside with sand etc.

This is a pic of the shim in the bucket - the tool holding the bucket down is just visible on the left side of the bucket.
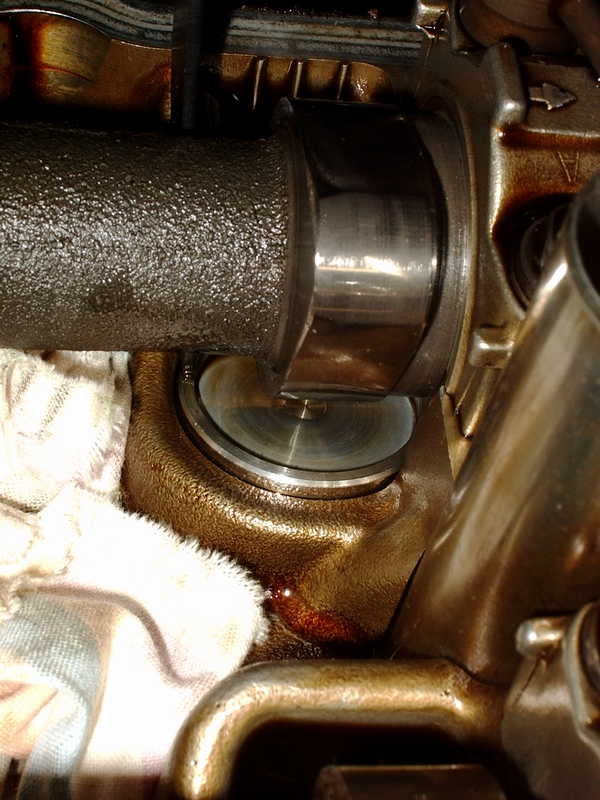
I have removed the shim showing the empty bucket. The cams are designed to rotate the shim inside the bucket.
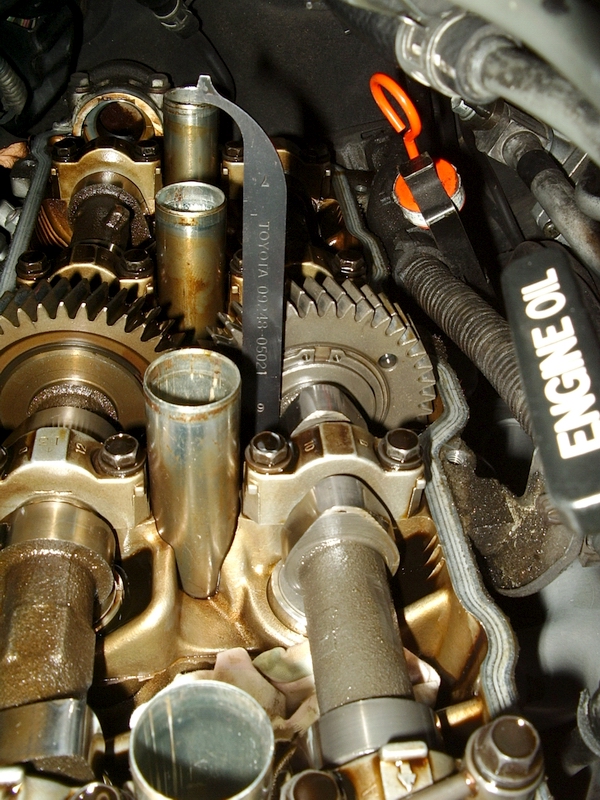
Here is the tool in place holding the bucket down on the exhaust camshaft. It's a
fiddly job and not much room.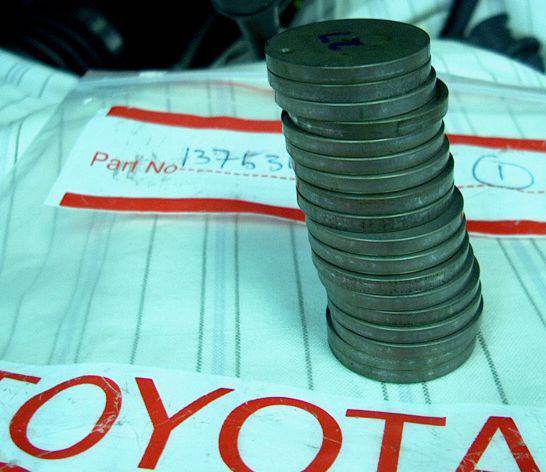
Here is a stack of very different shims. The thickness of a piece of paper can make the difference between a tapping noise and no noise.
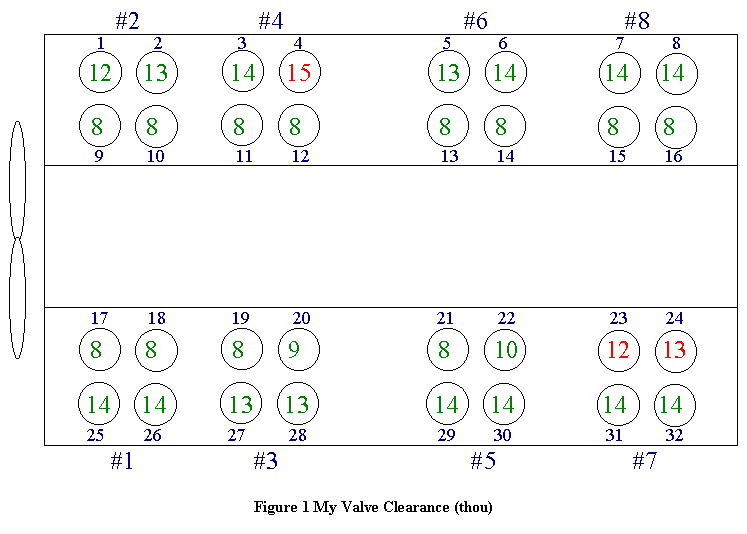
Here is an early map of my engine with the gaps recorded in thousandths of an inch. Gaps are supposed to be 6-10 thou' on the intake valves (the inside rows) and 10-14 thou' on the exhaust (oustside rows). The numbers in red show where the gap is now too big and shims need to be addressed.
Several times I have read that the battery side of the engine, at the back, is a common place for the tapping noise to be heard. If this is the case it suggests a common oil flow problem to that area.
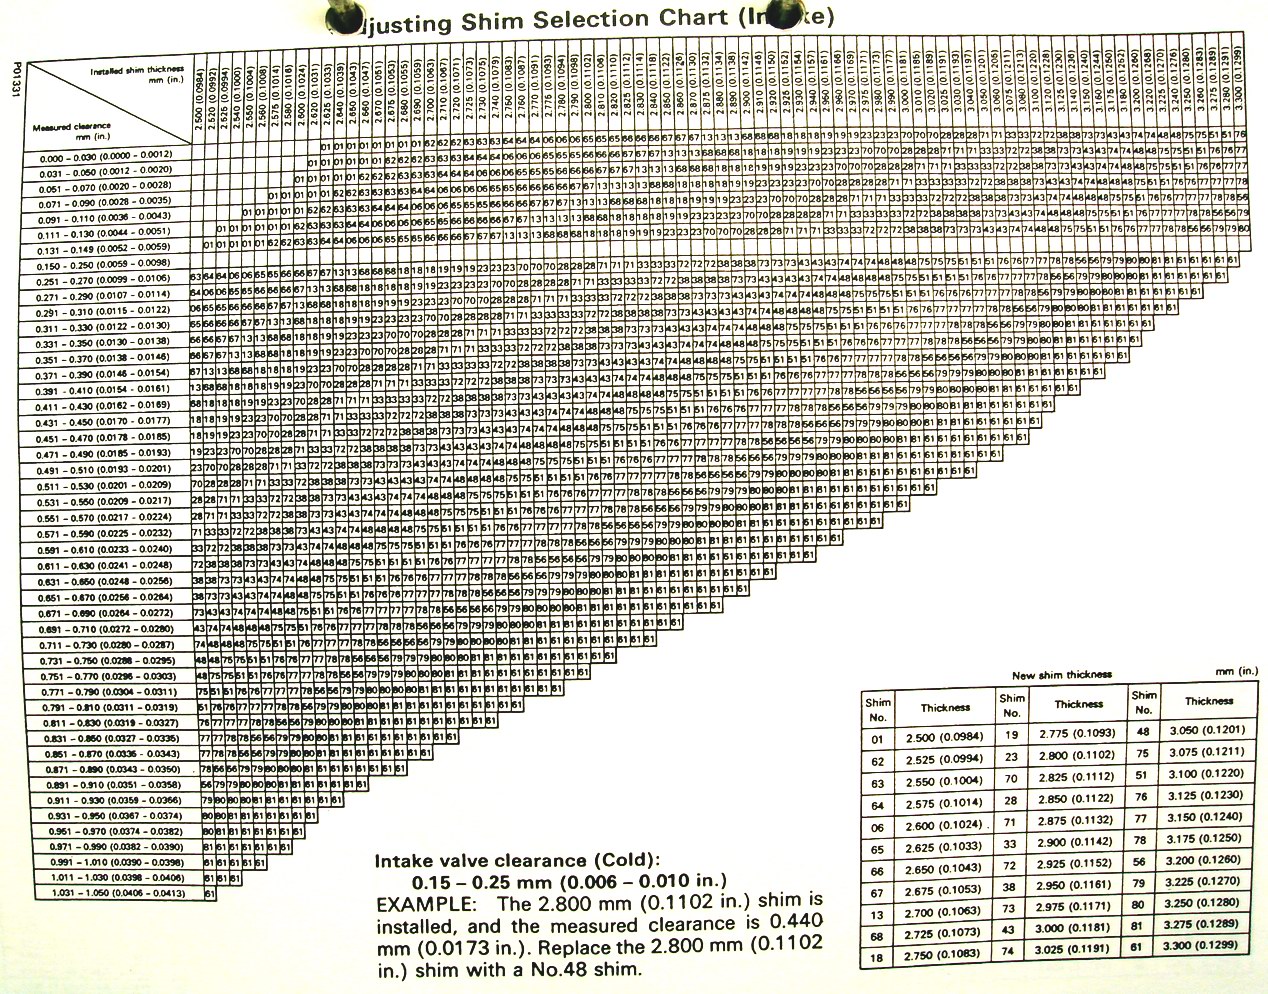 This is a table from the factory manual to
help calculate new Intake Shims thickness. A manual is recommended for DIY
This is a table from the factory manual to
help calculate new Intake Shims thickness. A manual is recommended for DIY
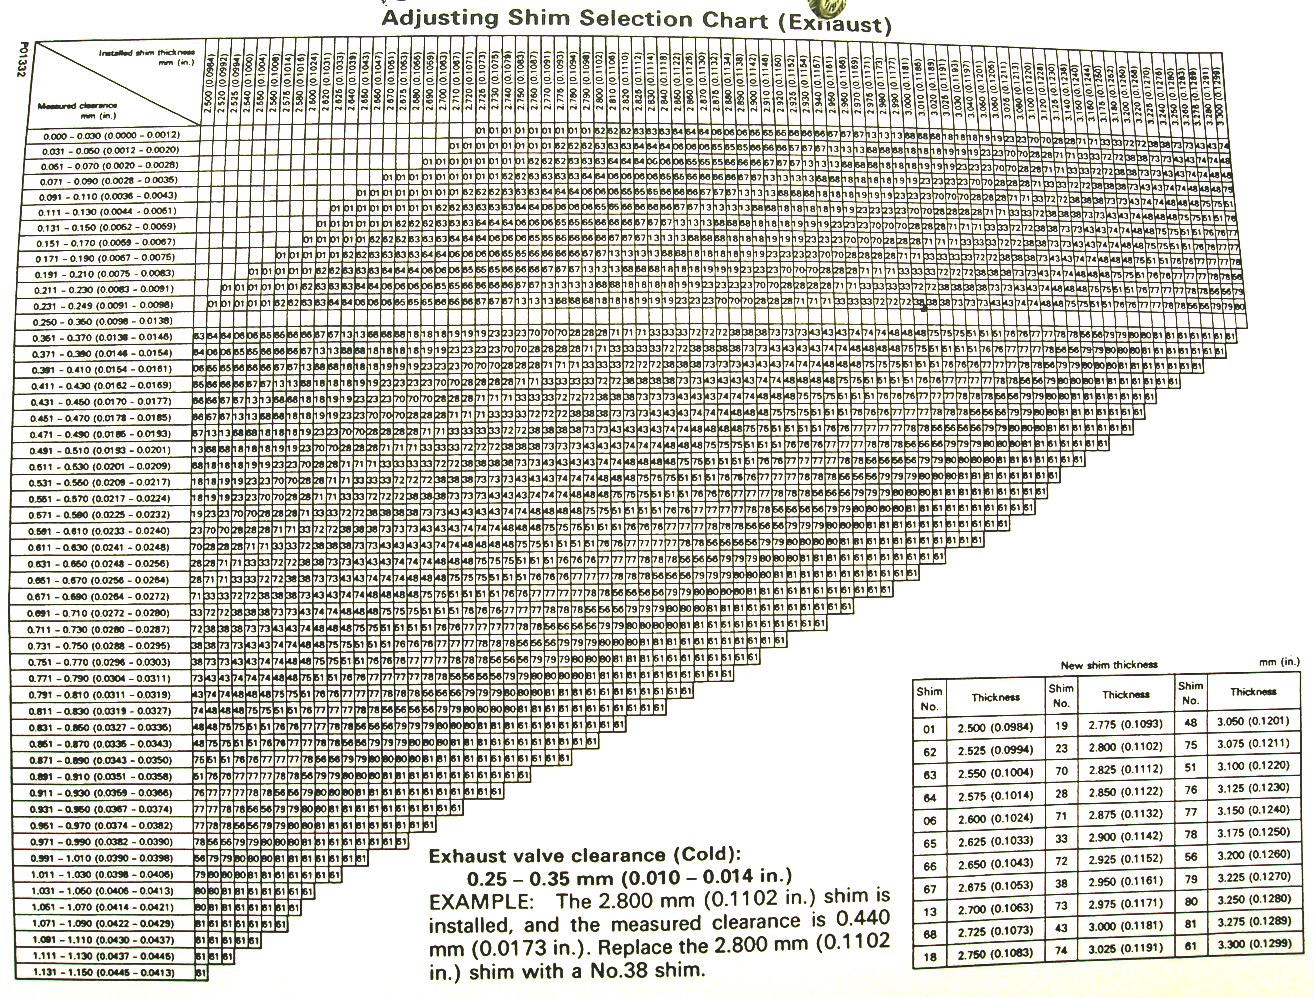 Same again - this one is for the Exhaust
Shims. It's a complicated business!
Same again - this one is for the Exhaust
Shims. It's a complicated business!