This applies to airbag UZZ31's and Active UZZ32's. The coil sprung TT's and SC300's don't have this option - you will need new springs to lower those cars.
In each wheel well you will see an adjustable rod that sets the ride height of the car. The adjustable rod is circled in red - you can only see the top of it in this photo - the bottom of the rod is behind the disc. This is the font driver's side wheel well.
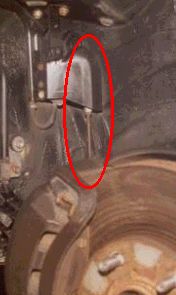
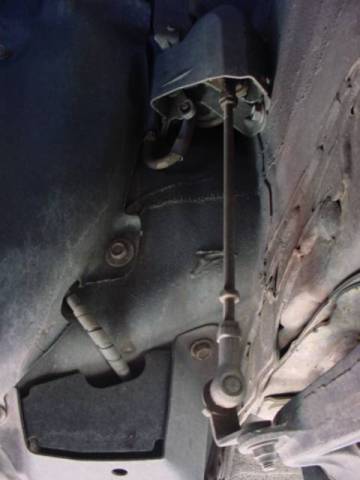
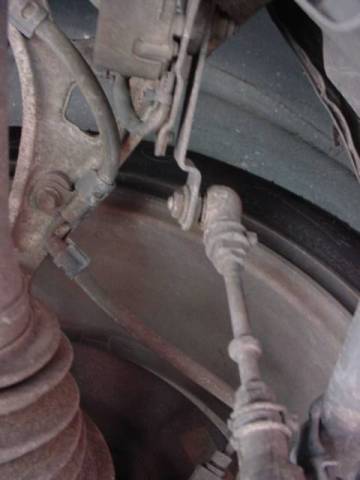
From left to right is the front rod, front rod (different angle), rear rod (it is shorter than the front one)
If you look carefully at the rod you will notice that there is a left hand thread and a right hand thread at either end with lock nuts. There is also a fixed nut in the bottom third of the rod. This fixed nut is used to rotate the rod once the lock nuts are loosened. Rotating the rod one way screws the rod in at both ends reducing the gap and lowering the car.
If you measure the lever arms from the suspension pivot point to the centre of the disc and to the rod you will find the ratio is approximately 3 1/2 to 1.
If you want to lower the car by 10 mm, then if you screw in the rod by about 3mm total then you will be in the ball park.
The top lock nut can be loosened with the plastic shroud in place - it is a bit fiddley. Try to support the ball joint when loosening the lock nut.
Scatch a clear mark in the rod so that you know where you are starting from. Rotate the rod an even number of turns - I rotated the rod three turns to lower by 10 mm from memory. Make sure you rotate the rods by the same amount on both sides.
If the car was level before then it will be level afterward if you rotate the rods by same amount on both sides - that's why a mark on the rod before you start is a good idea.
Undo the locknuts top and bottom (remember that there is a different thread top and bottom - you will feel as if you are tigtening up one of the nuts when you are in fact undoing it). Carefully inspect the threads - clean with a toothbrush and spray with WD-40 or CRC. Make sure you are clear which way each thread is going.
Undo lock nuts until there is an even gap top and bottom that is a little bit larger than the amount you want to reduce the effective rod length.
Now you can rotate the rod an even number of turns counting as the mark goes past. Do up the lock nuts. Don't forget how many turns you rotated the rod.
Do same to other side.
Go for a drive and compare new height to old height.
Best to get a wheel alignment now that you altered the geometry.
Factory specs are available at Steve Cheethams site (see links on home page).
| 2.5GT | 2.5GTL | 4.0GT | 4.0GT | 4.0GT | ||
JZZ30 |
UZZ30 | UZZ31 | UZZ32 | |||
| Front | Toe In (mm) | 1 | 1 | 1 | 1 | 0 |
| Camber (deg) | 0deg 00min | 0deg 00min | 0deg 00min | 0deg 00min | 0deg 05min | |
| Caster (deg) | 2deg 55min | 2deg 55min | 2deg 55min | 3deg 00min | 3deg 05min | |
| King Pin (deg) | 9deg 00min | 9deg 00min | 9deg 00min | 9deg 00min | 9deg 05min | |
| Rear | Toe In (mm) | 4 | 4 | 4 | 4 | 1 |
| Camber (deg) | -0deg 50min | -0deg 50min | -0deg 50min | -1deg 10min | -1deg 20min | |
I have used these with great success on my Soarer, so have others, so print it out and take it with you next time you get your alignment done and if you change your bushes.
How low can you go? I don't know, but you wouldn't want the tyres to disappear up the guards - be reasonable, don't over do it. No use sacrificing safety and handling just for a perceived "cool ride". Don't Lower it too much - use your head and a bit of common sense.
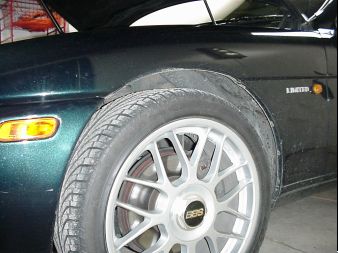
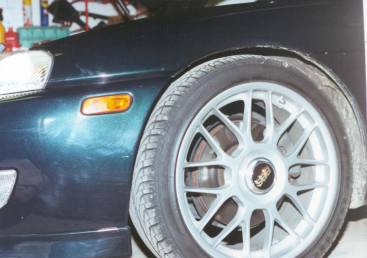
Here is the before and after photo - gives an idea what two complete turns of the rod does to the height. I've done the rears two complete turns too now. That worked fine too.
If you give it a go let me know what you think and tell me how it went.