
DVD installation for Toyota Soarer
Sansui DVD player DVP2002B in the glove box.
DVD installation for Toyota Soarer Sansui DVD player DVP2002B in the glove box.
|
September 2003 by Mel Grebowski. For those of you who have a EMV screen in your Soarers, and would like to enjoy the beautiful sound and picture of a DVD, you might find this page of interest. Last week I decided to look at installing a DVD player in my car, and since I needed to either fix or replace my 12 stacker CD player (both expensive I'm sure) I was very happy to find a fully mobile DVD player adapted to "in car" applications that was capable of playing DVD in NTSC and PAL, CDV, Normal CD, CDR, CDRW as well as MP3 (on average you can fit up to 185 songs at 3.5 MB on to a single disk in MP3 format so its like having a stacker anyway). The DVD I selected also has the ability to play video and audio inputs for further entertainment modules such as X-box, Play Station, TV tuner or video camera. |
|
 |
After
searching a couple of sites I came across a site by Mr. Richard Baird
from ALSC, in which he provides
excellent information on how to install this type of DVD player in the boot. Placing the
unit in the boot works very well and if you can live with the fact that you will need to
pull over each time you want to change the CD, then you probably don't want to waste your
time doing what I'm about to describe here. I wanted easy access to my player so I opted
to place the player in the glove box, however there is one problem - the unit is
approximately 30 mm too long for the glove box door to shut properly and that's not
including the RCA plugs which need to be plugged into the back of the unit. The next step
was to remove part of the back of the glove box to create more room. Pictured below is a
view of the AC-Heater unit that sleeps behind the glove box. By cutting the back of the
glove box you are likely to gain approx. 10 to 20mm depending where you take that
measurement from. On the left - Sansui DVP2002B purchased from Strathfield Australia |
| Cutting out the front door liner to the glove box will gain you a further 5 to 10 mm depending how your DVD is fixed within the glove box, but this is still not enough. There really wasn't sufficient room to whack the unit in facing the passenger. The following step was to see if the unit can be installed side ways in the glove box, no problem there, except that the unit has to be secured when the door is shut so it doesn't move whilst going around corners etc. However to access the unit the user needs to be able to swing it from a sideways position to face the front. | 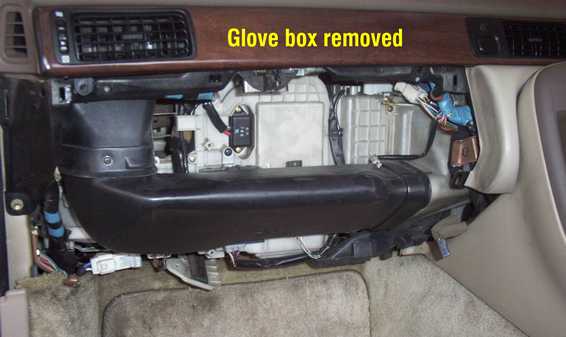 |
 |
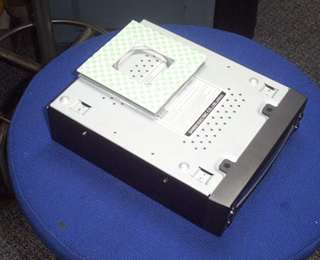
I have
found the perfect solution using "Carba-Tec"
Lazy Susan Bearings, which are commonly used by cabinet makers for rotating tables and
displays etc. The one I used is a 4" square bracket bearing which costs $ 3.50. I wanted the unit to be secured, both when in the glove box as well as when its swung out. For this I used another item from the cabinet makers, the "magnetic snap locks" which I picked up from a hardware store for around $3.00 a pair. |
| First of all run the RCA cables to the area
where the TV modulator is located (under the back seat on the drivers side) you will need
to tape your leads together (audio and video cables) and run them under the carpet near
the threshold moulding, which can be gently "popped out" using your fingers on
the passenger side then cut the RCA plugs off at the end that is going to be connected to
the modulator plug and strip back the insulation to expose the 'shield and positive wire'
(positive wire is the core or inner wire). Also try to remember the polarity of your audio
cables. Connect the wires as per Richard's description to the modulator plug (26 pin) with the exception of power supply which can be obtained from the cigarette lighter, replace the back seat and threshold moulding and you should be done with the back. Should you wish to have the comfort of having the visual as well as audio, while you are driving. I followed instructions and removed the speed sensor and hand brake cut out and while I was behind the EMV I connected the power supply to the cigarette lighter. Remote control pickup sensor can be fitted whereever you like as it comes with plenty of lead, I have chosen a spot on the dashboard right next to the central locking pickup, it is the red bubble on left hand side of the dashboard. With all the connections made and end plugs positioned next to the glove box area it's time to test the system by connecting all the plugs to the back of the DVD. Turn the ignition switch to ACC, the power button on the DVD player should be now glowing RED, press it and the unit will power on. You can also use your remote control to power up the unit. Next press the TV button and the DVD logo should appear on the screen, place the DVD in the player and ENJOY the sound not to mention the picture quality out of this fine grain VCD. |
|
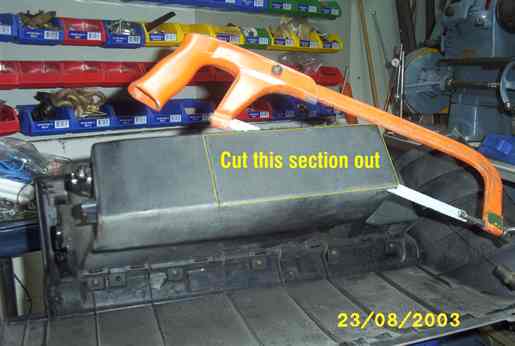
| Finish off by mounting
the player so it can operate safely in the glove box. Start by cutting approx. 2/3 of the
back of the glove box as per picture on the right, you still need to do that even though
we are going to install the unit sideways, to allow for free movement of cables,
additional space for RCA plugs once the unit is "Swung" out as well as
additional ventilation. Next attach the "Lazy Susan Bearing" to the under side of the unit with double side tape also applying the tape to the side of the bearing that is going to be stuck on to the glove box (if your glove box is lined with black felt, you will need to remove it from where the tape is going to go, otherwise it will not stick). The location of the bearing on the DVD and glove box is quite important. Use the photo below as a guide and test the location of the player in the glove box prior to fixing it in position. It must swing in and out uninterrupted with the front panel as close to the right hand side of the glove box as possible, then stick it in place. |
 |
 |
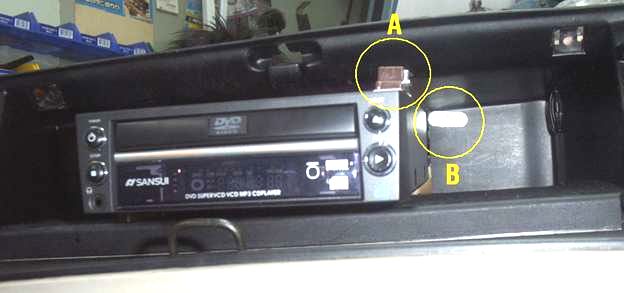 |
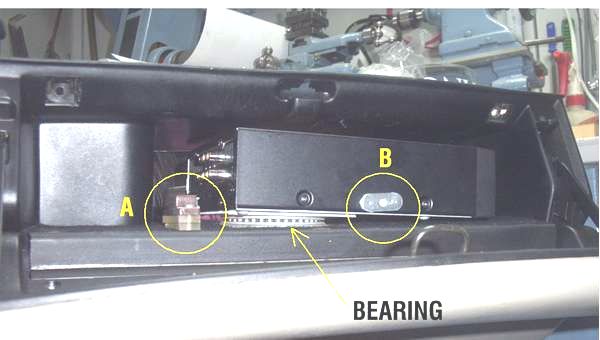
| Photo on the right indicates the location of the magnetic lock which is temporally stuck on the player with double side tape (A) and contact plate in the back of the glove box (B) in order to get exact location as they will not work if slightly off. Once you get the position right, stick or glue the magnet (A) in position, do the same for (B), the locks I used are Brown in colour, they also come in white, don't know about black or smaller size as I did not spend too much time looking around. The locking force of these locks is 4kg, which more than adequate. |
 |
The left hand side
photo shows the location of the other magnet (A), (which will have to be elevated from the
bottom of glove box floor, as it will miss the unit) and the contact plate (B). Make sure
that the magnet (A) does not interfere with the swinging operation of the unit, it will
have to be bolted with small bolts and nuts to the glove box. Next, connect all of the wires and reinstall the glove box in its position, you may have to play around with the layout of the cables and RCA plugs as some of them may catch or obstruct the movement slightly. The power supply lead should be extended between the end plug and in-line fuse box as it gets stuck behind the unit in its original length, make it approx. 30 cm longer and you should not have any problems. |
Please take note: If you want to use a DVD player other then the one described here, please remember couple of points:
|
| Special Thanks to Richard Baird from ALSC, for his information on wiring, locations of components etc etc, please visit his site as its a gold mine of information related to the above, All the guys from ALSC forum for their information and tips. |
Disclaimer: Information provided on this page together with all the links is free of charge and intended for your information only. The sale or distribution for commercial purposes of text, pictures and drawings is forbidden by the Author/s. Author/s do not accept any responsibility for actions or damages caused by the above information. If you do not feel FULLY comfortable with your ability to perform any of the above tasks or do not fully understand the procedure, do not attempt the above project/s as damage to yourself, your vehicle, components you are trying to install or third parties and their property, may result from your actions. Please check if modifications you are about to perform are legal in your state or country. Some modifications done to your vehicle may impact on your warranty and/or insurance so check with your car supplier/insurance company, tools used on this page may require skill and knowledge in order to reach the required end result in presented quality, if you do not have these skills your end result may differ from the above. Power tools are dangerous, wear protective clothing and eye glasses at all times. |
Back to Planet Soarer |
 |