 SOARER / LEXUS SC Door Trim Repair -
HOWTO!SOARER / LEXUS SC Door Trim Repair -
HOWTO!
SOARER / LEXUS SC Door Trim Repair -
HOWTO!SOARER / LEXUS SC Door Trim Repair -
HOWTO!With the ALSC Workshop day, it became fairly apparent that the state of the door trims
in your average Soarer is not good! It was often a case of once the trim came of, spending
a minute or so shaking out all the bits of plastic that have become brittle and crumbled
away into other sections of the door itself.
You will be very suprised at the number of cracks/splits/breaks to be found hidden away in
there...
It is probably a good idea to get in there to fix it up before a break or crack comes
through the vinal - but for some it is too late!!
Getting the trim off is not a difficult task:
1. Pop out either the courtesy light below the window controls or the window control panel
itself and disconnect all the visible cables to the panel itself and the courtesy light.
Do either first and use the hole to push the other one out. This does not have to
be done, its just easier to do it now.
2. Remove 3 screws along the bottom of the door.
3. Remove 2 scress from the front end of the trim, near the hinge under the caps.
4. Remove the 2 screws which are visible under the door handle itself.(long ones)
5. Pop the black cover out from behind the leaver that opens the door using a screw driver
to get in beside the locking mech.
6. Remove the screw visible under that cover.
7. Use the handle to 'unpop' the trim from the door. A sudden 'jerk' should be enough.
8. If you have seat memory and/or seat heaters, unplug the corresponding cable.
9. Pop out the 2 cables that lead to the door handle and lock point and lift the end out
of the catch. (you can't confuse these later on..)
All the screws should be 'groupable'. Don't get them mixed up or the holes will be damaged
by a bigger screw and will never be the same again!
Once the trim is off, lay it where it will not be damaged further like on a piece of
carpet. On the backside of the trim remove all the screws that keep door handle/door bin
assembly in place. It should pop off with a little convincing. You will need to rip a
strip of foam on the outer edge. Be careful because the 'wooden' material used can be very
brittle.
Once the trim is in two sections, the extent of the damage should be apparent. The most
common damage point is where the long screws go through under the handle. These tabs will
probably be non existant as was the case here:
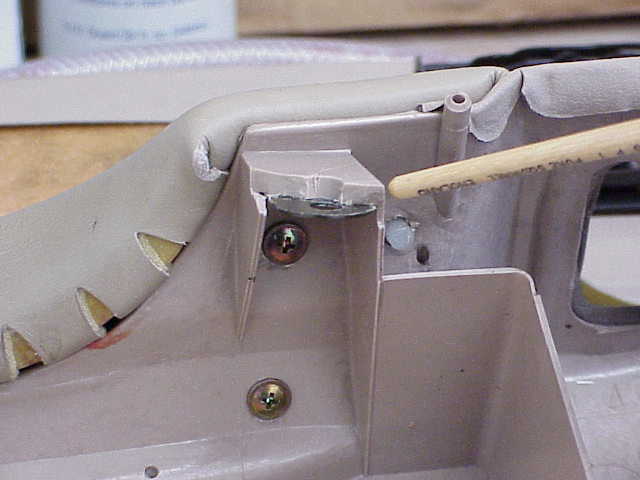
This is tricky to repair properly as it will be nessesary to build the plastic back to its
original state and then shaped accordingly. The best bet will be to use some plastic
filler and let it set hard before doing anything with it. The skills of a well practised
plastics wizard will not go astray - which was very fourtunatly on hand on the workshop
day, whose details will be available on the Web site shortly.
It should be noted that the black metal tab shown in these pictures is not present on all cars (mine is one of them) and apparently was the reason for a Recall done by Toyota to have those installed.
Along with that you will probably have the obligatry crack(s) around the speaker grill
and/or the window control panel: 
Give the entire door a good look with your eye. Worse cases will have that crack through
the vinal covering. If you want this fixed properly, call in the proffesionals unless you
have all the gear you need or you don't care how it looks afterwards!
Other 'problem' areas include:
1. The screw hole tabs that hold the speaker grill in place.
2. The screw holes along the bottom of the trim. (in that wooden crap)
3. Cracks in the bottom of the door bin.
4. Screw hole stems broken off.
5. Tabs that hold in the courtesy light and/or the window controls. 6. There are others!
How you fix these will depend on what you have available at the time. It might be a good idea to investigate the damage and then workout the best way to fix it before taking a trip to your local hardware store.
The cracks in the plastic can either be welded or glued, but some kind of adequate re-enforcement should be used to ensure it does not happen again. The easiest 'home' fix for this will be a bit of fibre glass or a lump of glue. What you use will depend on where the crack is and how much stress you can expect to place on it.
Another thing to consider is re-enforcing the point where the door handle is secured to
the door itself:
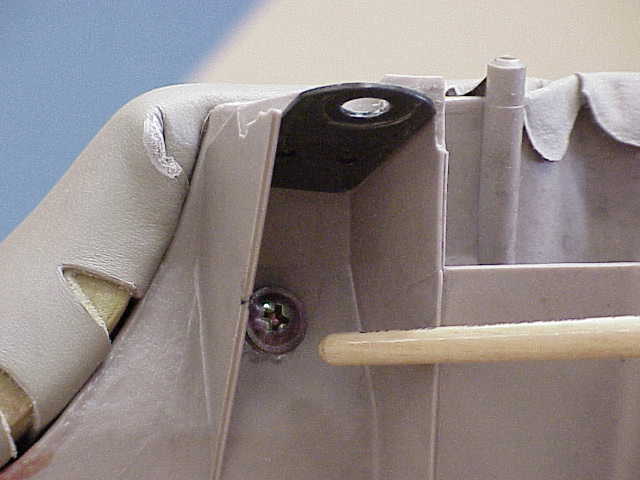
In Barry's case, this was done by gluing the corners where that black metal tab meets the
plastic. Originally, the plan was to use an aluminium bracket bent at 90 degrees with one
side screwed in under screw indicated but that screw is not long and would more than
likely eventually pull out. The glue in the corners seemed a much better idea at the time.
Whilst you have the trim off, run around the door itslef with a screw driver and a
socket to tighen up all the nuts/bolts/screws you can see:
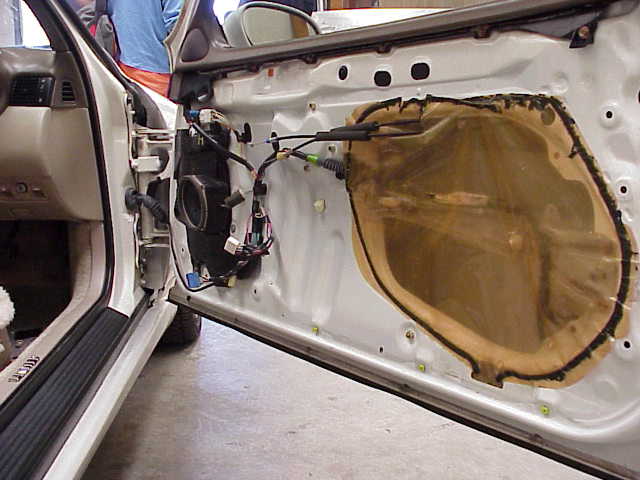
You are almost gauranteed of finding some of them loose. If you have a rattle in the door,
this will more than likely cure it as well. Use a hand screw driver or a battery drill on
its lowest of low touque setting to ensure you dont crunch the brittle materials used.
Same does for the trim itself.
Also get in behind the plastic sheet where there is a nut that locates the window on the rail. It also wouldn't hurt to lubricate that rail with either some silicon spray or CRC or RP7. It is also a good opportunity to get in and clean the door trim with some spray and wipe or other chemical. You can also take out the speaker grill and wash that out as well.
Once you are happy with the repair, you can get to putting it back together again. As you do so, make sure you connect everything you disconnected - including the door lock and opener.(and yes I have been caught!) As you put the screws back in, again make sure you do so gently, especially the 3 screws along the bottom and the 2 close to the hinge. The material will crunch very easily and will not hold anthing properly. Also make sure that it is 'popped' back into place OK.
At the end of your little project, you should have a nice, clean and solid door - just like new!
Happy Soaring!
Words: Aaron Elliott. Photos: Steve Howlett