 |
Dash Repair for Dummies and no more door chimes! |
 |
|
Dash Repair for Dummies and no more door chimes! |
|
Clean your dash , repair the bits that don't work, remove the reversing beeper and door open chime in just a few easy steps! With air bag light removal procedure at end.
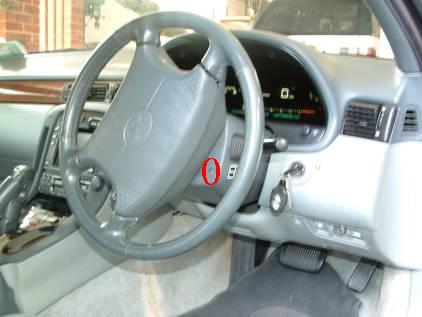
In the US and Canada the SC suffers from burn't out dash needles - I don't know how hard it is to fix this. The right hand drive Soarers suffer from parts of the dash not working. But $2.50 of parts and it is like new. While it is out you can polish the mirror and plastic cover to get that jet black look and ultra clear numbers back like new again - my dash looked pretty good - but the mirror was filthy - now it is startling! You can also remove the reversing beeper. Even if your dash is fine, cleaning and disabling the reversing beeper make it all worth while. I used Steve Cheethams site as a reference for the dash repair and removal.
The bottom display of my dash wouldn't light up on cold mornings - stage 1 of the famous blinkydash problems. Stage 2 is when the whole dash doesn't light up. This wouldn't happen to Rob as his car never gets cold and never spends the night outside alone!
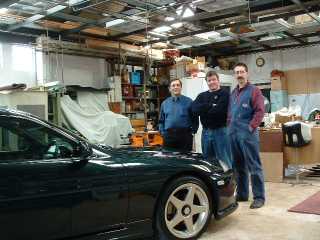
That's Harry, me and Rob in Rob's shed - Rob's car prefers nice soft carpet to park on!
Harry knows how to fix the dash, I was pretty keen and Rob put up with us.
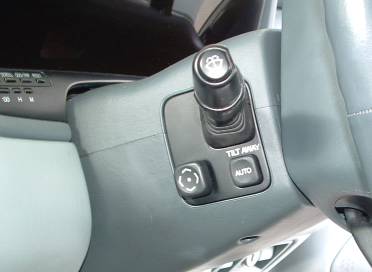
First thing you have to is make sure the Tilt away switch is OFF! Make the wheel go as far away and as far down as possible. Then put the key in and out and make double sure the wheel doesn't auto retract - if it auto retracts when you're not ready then it may crush dash bits while you yell "Gossssshh Daaarrrnn" etc - this would be a bad thing! Then take the keys out and put them on a piece of paper. On the piece of paper write
"Don't start the car you idiot until the dash is back in!"
This will hopefully slow you down - if you start the car with the dash out then the airbag light will come on forever and you will have to remove using a fancy procedure. But that won't happen to you though will it? (Fancy procedure is at the end.)
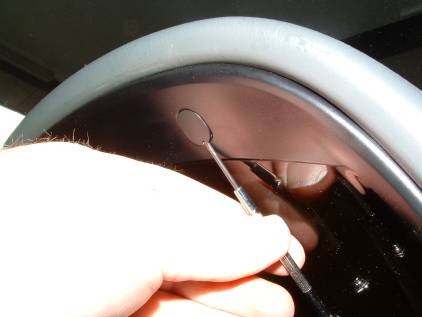
Turn the wheel like in this fuzzy picture. Still learning with the new camera - the icon in the camera screen with the shaking hand means not enough light and fuzzy pictures - took me a while to figure that out! (two screws - one on the other side for the mechanical tilt wheels)
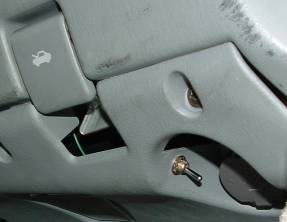
Anyway this will expose a screw below the indicator - take it out.
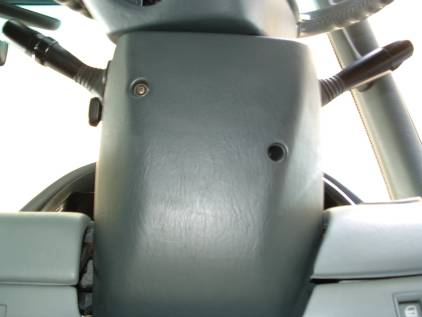
Then two more phillips head screws underneath.
First hard bit. The covers pop apart - but boy can they be tight! Press with your fingers where that loop bit is - don't use a screwdriver, you'll mark it. Just keep fiddling and trying things - it will come. 2nd time is a doddle.
Don't take the top one out yet! You might break it - the top half comes out later.
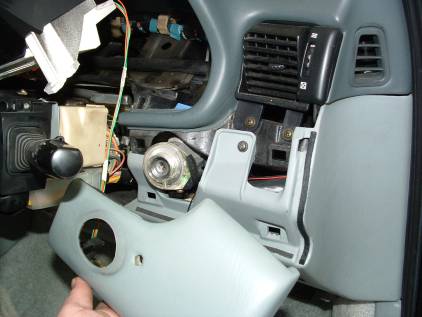
Now pop out the ignition ring - pull it out with your fingers - not much holds it in.
Look! - the top half is still in! This ring gets in the way when you lower the steering column later.
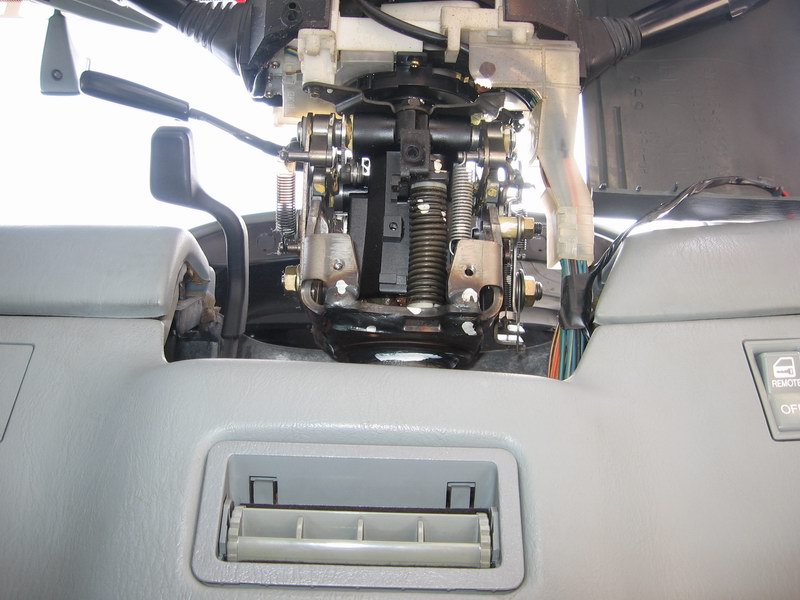
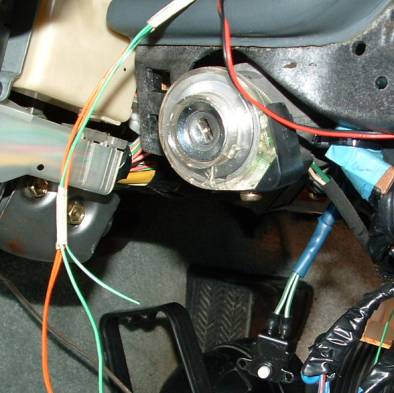
This is the most important bit of all.
This is the difference between "Mission Impossible" and "Walk in the Park". If you want a challenge then avoid this step!
See those two bolts? Loosen them, don't remove them, no need. Easier to leave them there - just undo them to the end of the thread - that'll be good enough.
This will allow the whole steering column to lower and give the essential clearance that is absolutley necessary to get the dash out.
BUT
The mechanical tilt wheels are different - check above pic (thanks N J Herbertson)
This is the KEY to the whole operation! This is looking under the steering column.
Now you take the top half out - it is so easy now - you look like you know what you're doing! Check out the quality of my steering wheel - the best '91 steering wheel I have ever seen! It has been so well looked after.
The black bit along the bottom was real tight on my car - real tight - I was sure it was going to break. It is held in with four clips. Grab it with two hands, thumbs down the bottom and start grunting! I got Harry to pull it out - I was sure it was going to break - but it came out in the end - first time is the hardest.

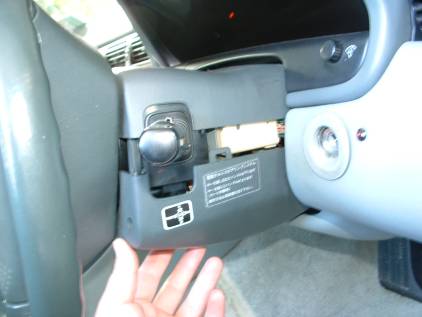
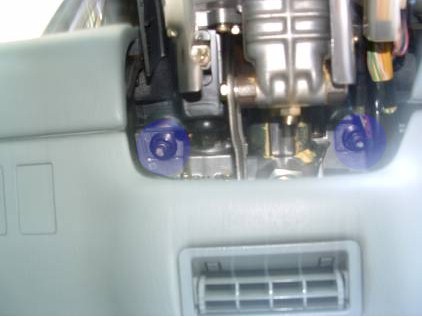
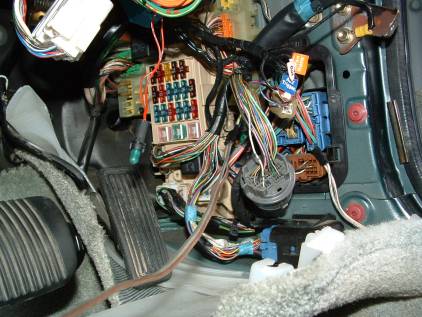
White plug on the left, blue on the right - easy to get to, easy to unplug. Now you can see the two screws on the bottom, one on each side, that hold the dash in.
Pop out the two screw covers top of the dash with a small screw driver. Rob has the best collection of screw drivers I have ever seen - his watch maker set is superb, and he has over 20 flat blades and the same number of phillips head's - each one with their own story- sheeesh!
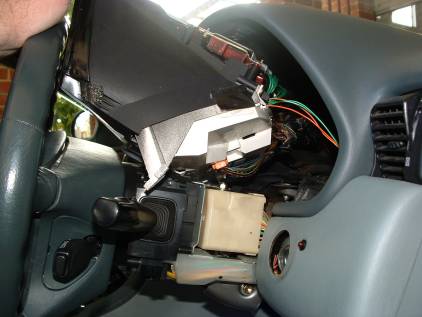
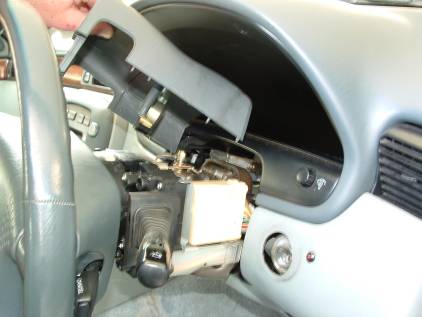
With the steering column lowered out comes the dash so smooth , so easy! I think I took the top edge out first hmmm take your time - no rush - it will come out. Get that orange plug first - the tab to press is on top of the plug.
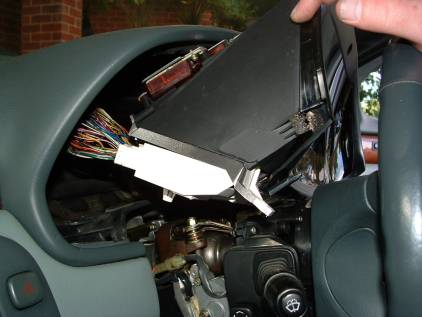
On the other side the white plugs are a bit harder - the tabs are on the bottom - you have to press them in to get the plugs out - bit awkward - but you'll be ok
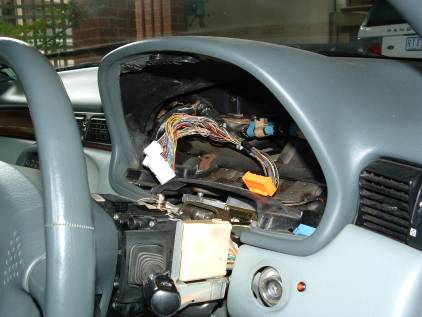
All done piece of pie!
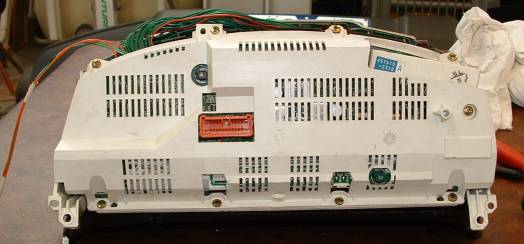
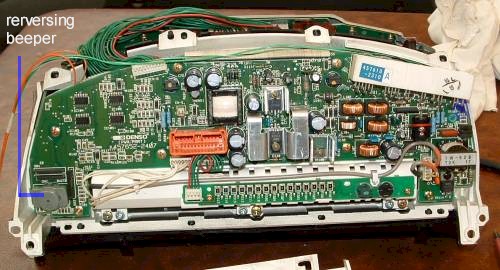
Here's the back of the dash on card table - remove the white plastic cover to get at the reversing beeper and those capacitors to replace etc. That screw middle right is extra long - you might think you have lost a screw when you put it together - but this is the one.
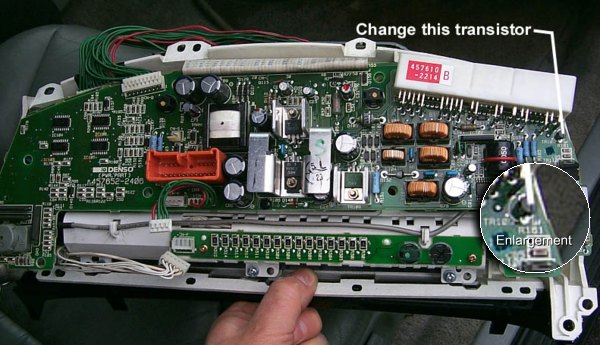
The grey reversing beeper bottom left - pluck it out and destroy it! The bottom display not working on cold mornings is a faulty transistor - labelled "TR109" on the board - it is located far right, just below that big white plug - I coloured it blue in this photo on the right. It is a 2SC1213, so replace this one.
Remove the the screws to get at the second board behind it. Do it carefully - there is a piece of glass in there - don't want to break that!
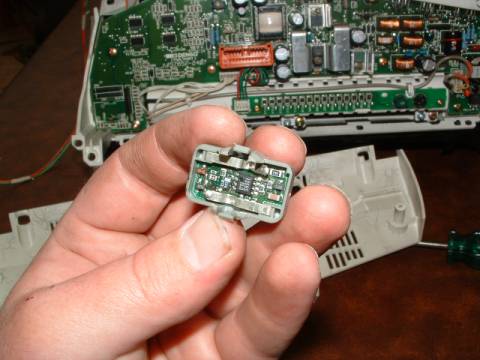
The reason I look so happy here is I thought at the time it was the door open chime - but it wasn't - it is the reversing beeper, second best I suppose. You don't need no reversing beeper - you have a Soarer not a vegetable truck at the Markets, so ditch it - you dont need it no more! Just unclip and crush it in a fit of rage - don't be tempted to leave it or replace it! Get it out of your life!
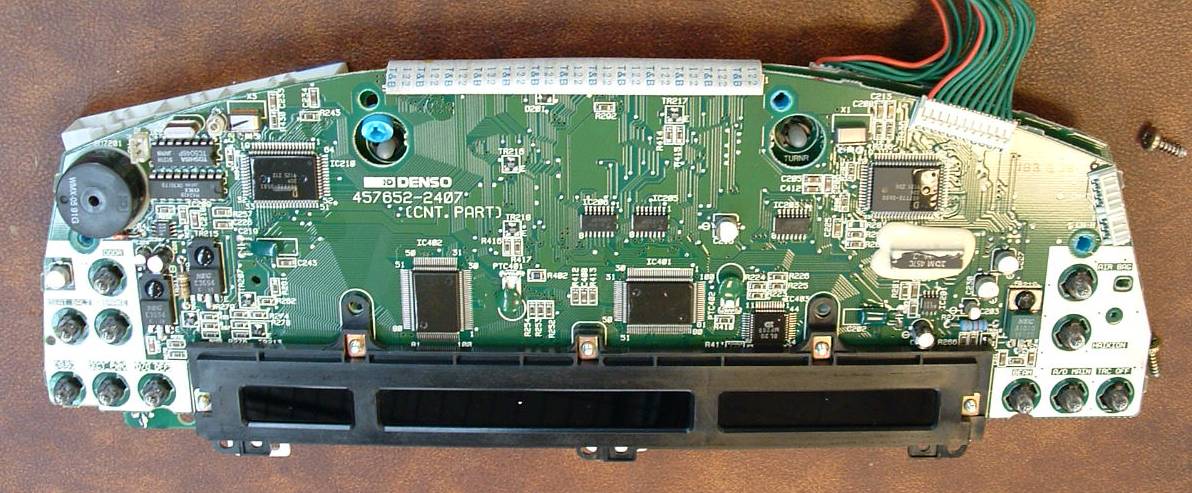
Once you pull the boards apart this is where the capacitors live. Click for larger image. The capacitors make the top of the dash go off - mine was fine but while it's out might as well upgrade for the future. the two you want are labelled on the board "C203" and "C220" - which are 6.3V 10uF. Harry reckons while it is out might as well replace all the capacitors - they are so cheap. The capacitors Rob went and bought from Jaycar weren't surface mount- Harry said it didn't matter - that one in the middle he had to lay flat to get it to fit under the cover.
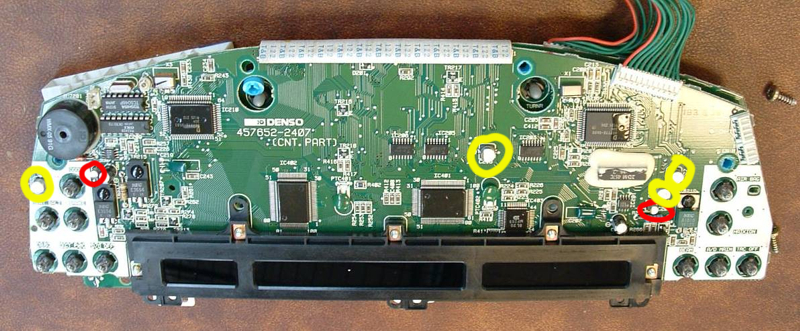
I've circled in Red C203 on the right, and C220 on the left. The "Other 4 Capacitors" I've circled in Yellow.
Juzza said: "When I did mine, I just took all that info to Radio Parts in Spencer
Street and the Techo there gave me the bits based on that info. I only replaced the 3
offenders and that was 3 Years ago - no problems since. Why make life harder than it needs
to be - replace the dogged ones and that's it - Jobs Done.There is only one Transistor to
Replace ... 2SC1213. One Tranny, Two Caps (the red circled ones), Clean the Tube,
Wipe the Glass - Fixed ![]()

Harry said;
"The original 10 uF capacitors in the dash are actually only rated at 10
volts. Reasoning behind this is that at elevated temps, the voltage rating
of a standard 10 volt electrolytic capacitor falls (to about 6 volts). Still
OK for the 5 Volt rails in the dash.
Anyway, I would probably get 16 volt rated caps, preferably either surface
mount (AS SMD is the original style of cap used.), or radial leads. (as they
can easily be fitted into the original position.) The 105 deg rated caps
would also seem to be a better choice, as it obviously gets fairly warm in
the dash. 63 volt rated caps are actually a little large to comfortably be
fitted, but they will fit!
There is also about four 47uF 10 volt rated SMD caps in the dash that I
would also replace as a matter of course while I have the thing open!
I suggest that the listed transistor are the same, just having slightly
different descriptions. (A BC639 will Always be Bipolar, and will always be
NPN)
The use of a BC639 is because it has the same lead configuration as the
original 2SC1213 transistor, as well as a slightly higher current rating. "
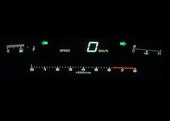
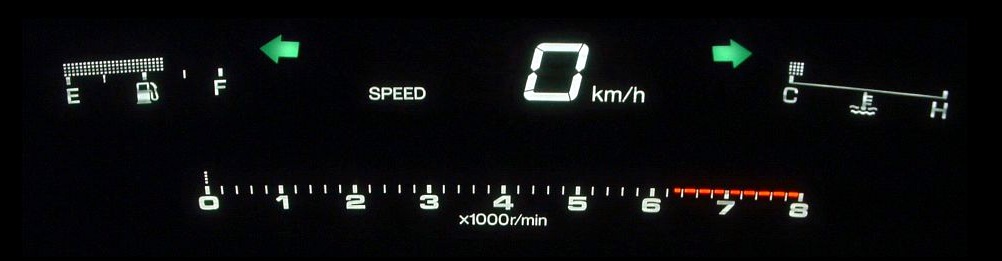
Down the bottom that black bar is the odometer etc. There is a long fluoro tube behind it - give it a wipe as well, mine is starting to get dark at the ends. That round black beeper is the warning for handbrake left on, fluid low etc - it can live.
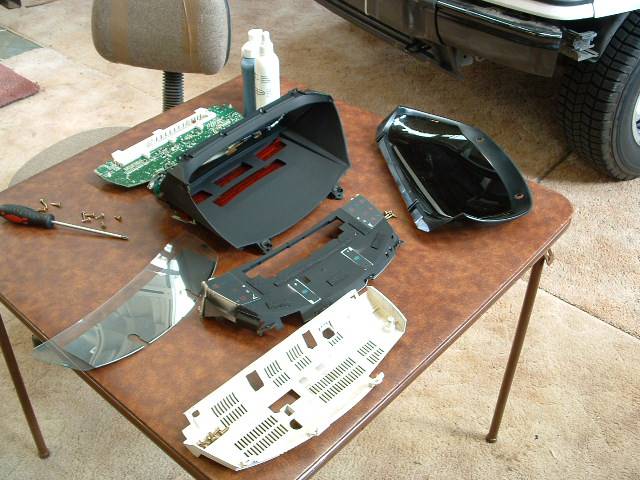
 The dash pulled apart ready for a good clean and polish. The odometer, warning
lights and indicators are on that middle black panel with the long slot - the mirror to
the left sits on top of it and reflects the speedo etc from above. In the roof of the
dash, see those orange/red slots, is where the fuel, speed, revs and temp gauges live -
you see a reflection of the top of the dash when driving. The mirror gets filty - give it
a good clean and polish. The plastic cover of the dash needs a good polish too - it will
have fine scratches on the outside and also have a film of sticky dust and dirt on the
inside.
The dash pulled apart ready for a good clean and polish. The odometer, warning
lights and indicators are on that middle black panel with the long slot - the mirror to
the left sits on top of it and reflects the speedo etc from above. In the roof of the
dash, see those orange/red slots, is where the fuel, speed, revs and temp gauges live -
you see a reflection of the top of the dash when driving. The mirror gets filty - give it
a good clean and polish. The plastic cover of the dash needs a good polish too - it will
have fine scratches on the outside and also have a film of sticky dust and dirt on the
inside.
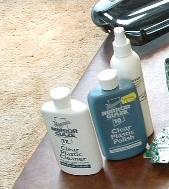
I used the two Meguires plastic polishes. No 17 in the white bottle "Clear Plastic Cleaner - Removes fine scratches" followed by No 10 in the grey bottle "Clear Plastic Polish Creates brillant optic clarity on all clear plastics". Finished up with Novus 1 Antistatic cleaner dust repellent. These products can be hard to get. Get out the yellow pages and try boat shops - I got mine from a plastics shop - grey bottle I got from auto parts store.
Now for the really hard part - the door open chime - I can't find it. No one on the planet has ever found it. I have heard lots of rumours and stories but nothing confirmed - no one has ever found it - no one has ever removed it and held it in there hand for all to see. No one. If you ever find it and can tell me exactly where it is then please email right away at pgscott@bigpond.com. I have tried real hard a couple of times over the last 18 months to find the stupid chime. I want to be able to be outside or at the drive-in watching the movie on deck chairs, doors open and radio on. But not in the Soarer. You can't listen to the radio or stereo with the doors open because of the incessant door open chime - drives me nuts. So if you can tell what it looks like exactly, where it is exactly then you will be a hero and I will dedicate a page to you! Steve Malkin suggested a fix works - you trip the door lock with a screw driver while listening - great idea Steve. When doing the dash I put a switch in to turn it off but not as good as removing the door chime and burning it!
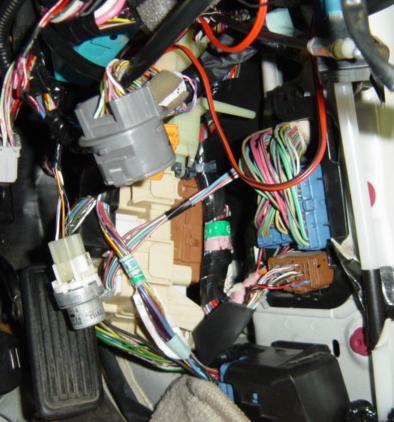
This is behind the kick panel on the drivers side - the door chime comes from here somewhere - Rob and I couldn't find the stupid thing - if you find it let me know - I know where it is roughly but we couldn't pin it down.
So I couldn't find the door chime, but I could find the switch that detected whether the key was in. This panel just pulls out.
Here is the switch that bolts to the key barrel underneath, it's black with a white button and two green/white wires - when the key is in the barrel, the steering wheel Auto Returns to the memory position - so I couldn't just cut it - it is handy for other things. So Rob inserted a switch he had left over from his early 70's Ford XB Wagon (I used to have one too!). Now when I listen to the stereo and the doors are open - I can flick the switch and stop the door chime. But if you know where the chime is please let me know.
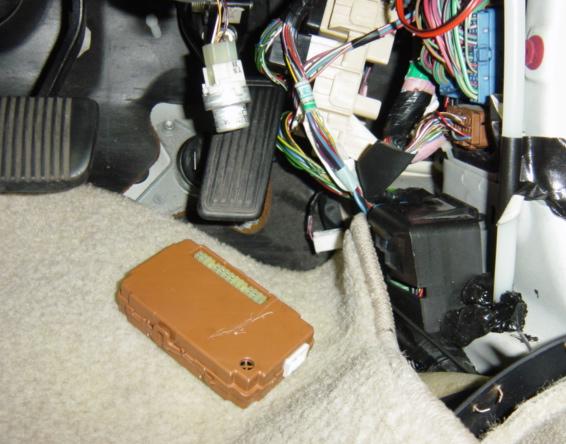
I mounted the switch in front of the diagnositc port below the bonnet open lever - didn't want my knees to ever hit it.
So there we are all done. Nice clean dash that is jet black against clear numbers, no annoying sounds and should work for years. Thanks to Rob, Harry and Steve.
I did the easy thing to disable the chime when watching the cricket - now Justin Hughes (who receives an Soarer Diehard honour award) has finally found the chime - the first person on the Planet. Here is what he said:
Pull off the very botttom piece of dash assembly, way underneath the steering wheel
by removing 3 screws and the Footwell Light and the Diagnostics port. (both just twist and
pop out)
Next pull back the carpet, away from the side of the footwell and bend the hard white
plastic way over so that it slides underneath the throttle pedal.
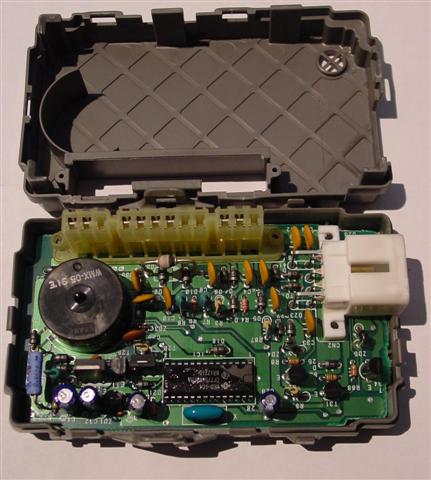
Now you should be able to see the large "relay / multicore / fuse board"
(Russell Newnham was Oh so close, I know you could smell it Russ !!!!)
The Chime Box is behind the fuse board,(between the inside of the Fender and Board) if you
put your fingers around the front end of the board you will feel the cigarette pack sized
box on the back of it. If you put pressure on the box you will hear the Chime change in
Tone and you should also be able feel the box vibrating slightly. It is Brown in colour.
(Baby Poo Brown)
Grab your 10mm socket and super extension, and look way down the bottom of the
fuse/relay/multi' board and you will see two bolts. Undo 'em !!!! Now pull your head out
of that damn footwell for a minute, have a rest and drink some Beer. (James Boags
preferably)
Okay, here's the clincher ..... kneel down so that you are facing forward looking at the
fuse/relay/multi board and the inside of the fender ....... and using two BIG, LONG,
Flathead Screwdrivers, gently prise the multi board up (with the first one) BE CAREFUL
(like a cat flap!!) from the bottom, not too far, just enough so that you can slide the
other screwdriver in to get at the side of the Brown Chime Box. Once you get some movement
out of the Box get back down in the footwell and try to lever it out with your fingers by
reaching around the very front of the multi board, it is secured by a long plug which is
part of the Box Housing, just pop it off. There is also a multi wire plug involved but
that is obvious once the Box comes out.
I removed a heap of the relays and plugs from the multi board which made things easier,
also I had the entire "underdash" off as well, as I was bypassing the Valet
Lockout at the time.
Best advice is to have as much room as possible to see and work, otherwise its just too
frustrating.
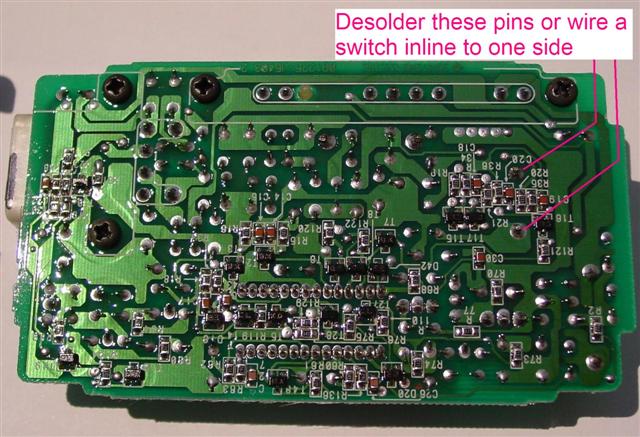
I Suppose one could remove the chime from the circuit board inside the Box, and replace
the Unit so that it thinks it Chiming away but isnt !!!!! ... I'm just going to leave it
out altogether and see what happens .........
I hope I havn't upset anyone by posting this, as obviously It has been a HUGE ANNOYANCE to
us all for a very long time, and perhaps there is an argument of grave importance against
removing it, which has led to the supression of the info relating to "The Fix".
I have to wonder because each and every other Fix, Tweak, Wangle, Tangle and Spangle is
plastered all over the place !!!!!! (Bar maybe 2) oh; no, make that 1. Hahahahaa !!
Anyhow; I know you all take great care working on your cars and obviously any
"Fix" is embarked on at your own risk etc....etc ..... !!!
- Good Luck and Best Wishes to all,
Then Trevor Taun pulled it out also and photographed and had a peak inside:
Well guys I had a go at the door chime today with my son who is a bit of a wiz with
electronics,and we succeded in stopping that annoying chime.As Justin mentioned it is
located behind the fuse box on the drivers side kick panel. As I was pulling out the dash
display at the same time to replace the back lighting to blue we pulled out the fuse box
at the same time(Boy what a job!....)We did a bit of investigating into what the box was
responsible for and found the following:
1/ Activates the key illumination
2/ Warning lamp (door open) in dash
3/ Light in footwell
4/ Interior light
5/ Door open chime
We decided to deactivate the chime and replaced the brown box so that all other items
would still function.I have taken a pic of the box( Justin's brown baby poo colour )which
is right behind the white fuse box.
so thanks guys - it's great to get this one finally solved!
If your car is turned on with no dash in place, say you have to move it for some reason, the airbag light will come on and stay on. The workshop manual lists a procedure to turn it off.
The Diagnostic port can be found inside the cabin in/under the crash padding on the
drivers side, in the corner between the dash crash padding and the kick panel. (Well, sort
of) It has the connection designations indicated on the lid.
Find a convenient Body ground. A third wire could be connected to terminal E1 (ground) if
you cannot find a convenient body ground to "drum" the wires against.
i: Connect two wires to the diagnostic port terminals Tc and AB.
ii: Turn the ignition switch to either Acc or ON, wait about 6 seconds.
iii: Starting with the Tc terminal wire apply Tc and then AB (alternate the connections)
to the cars ground twice in cycles lasting one second each (approx.) That is, apply Tc for
one second, and as you lift Tc off ground, (instantly) apply the other connection (AB) to
ground for one second. At the end of two cycles of this, and still holding Tc on Body
ground, watch the Airbag warning light, it should blink after several seconds to indicate
the codes have been cleared.
So the sequence is Tc, AB, Tc, AB, Tc on ground for several seconds until Airbag light
blinks, which indicates fault clearance.
Disconnect the wires and you have finished!
If at first you don't suceed, try again, you will eventually get it!
You don't need to be extremely accurate in your timing, the manual indicates 1 second plus
or minus 0.5 seconds (0.5 to 1.5 seconds) for each wires grounding period. You also have
0.2 seconds to make the wire to ground switch.