![]()
Sunday 4th November 2001
(The BFI equalled the high pressure test and got an amazing positive pressure reading in the wide open throttle test - easily the best intake by miles - this page is pre-BFI - so it isn't mentioned here)
As you can see I have decided not to call these things "Ram" intakes. They restrict flow at wide open throttle.i.e. The engine gets more air without them ! The LAOR meet on Oct 13th 2001 dished up 59 SOARERs - a perfect time to do some testing of different Air Intakes. See the Panel Filter page for the filter tests. On the day an SS Induction unit was tested and a K&N pod filter briefly looked at. The next day on the 800 km drive home I tested an S shaped stormwater inlet and a headlight scoop. They are pictured below. 6000 rpm in a V8 is about 384 cfm while 10 psi in a TT is about 404 cfm. The SS induction was tested in a TT while the others were tested in my V8.
If you want to read more about CFM calculations then go here;
http://www.badbricks.com/main_files/faqs/turbo_size.htm
If you just want to do some quick calcs by clicking on a few buttons then here you go:
http://www.smokemup.com/utilities/calc/airflow.cfm
Notice that terminal speed at the end of a 400 m run is the best indication of engine power. There was an article on AutoSpeed about this too. 400 m is a long way and you get pretty fast - you can do it over 200 m though and still get engine power (of course getting consistent times is the really hard part!).
Enough blabber - here is some stuff:
Aim: To determine the pressure in the standard airbox in front of the air filter at wide open throttle at 100 km/hr on the road.
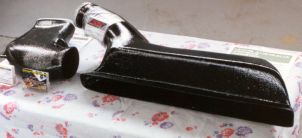
Apparatus: SS Induction Cold Air Intake for the SOARER ($450), 100 mm stormwater PVC pipe shaped like an "S" ($9), paper mache headlight scoop($2.50), U-tube manometer($3).
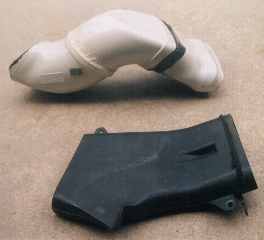
SS Induction Unit - takes air from underneath the license plate, routes it behind the high beam lamp and then a 90 degree turn into the airbox.
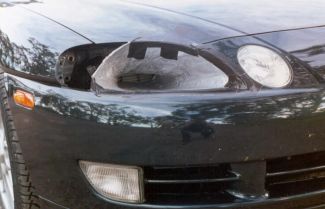
The headlight scoop collects air from the headlight area and puts it straight into the airbox.
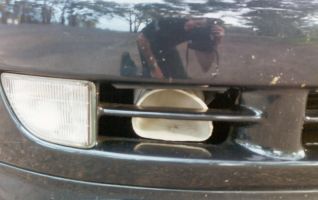
The Stormwater (100mm) pipe replaces the standard snorkel and collects air near the turn light.
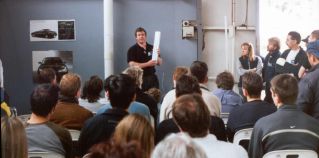
Here I am holding a manometer at the LAOR meet. Make your own fancy one by reading the instructions on these sites:
http://www.btinternet.com/~kemp.paul/manometer.html
http://www.rverscorner.com/articles/manometer.html
Method: Plumb one end of the U-tube manometer into the airbox in front of the air filter. The other end should be open to the atmosphere. Record the level of fluid in both columns (they should be equal) before the test - this is the zero. Switch the ECT switch to POWER. Select 2nd gear in the auto trans. This reduces the car's acceleration and gives a nice smooth response in the manometer readings. Accelerate the car at full throttle to about 110 km/hr. Have the passenger record the maximum reading obtained on manometer. eg If both tubes were at zero before the test and the tube connected to the intake went up to +2 (suction), the other tube will go down to -2. The difference between the tubes is the important bit. In this example the total is 4 cm of water suction.
Now cruise at 110 km/hr in drive. Take foot of accelerator and allow car to naturally slow down to 100 km/hr. Record manometer reading at this point. Repeat test to get consistent readings. Repeat test for each cold air intake.
Results: (note: 2.5 cm of water is 2.5 millibars or 0.035 psi - it's real small !) Remember - these are measurements in front of the filter - the filter has nothing to do with this test - this is all about the collection device in front of the filter.
When the hammer's down only the pod and an airbox with no lid deliver the goods. Even that big headlight scoop strangles the engine!
No positive pressure for the pod, the cold air intakes (stormwater and SS) deliver pressure. What happened to the headlight scoop?
Other Results:

Hmmmm....It appears that the stormwater cold air intake improves economy. This is a record of the fuel economy before and after fitting the stormwater intake. Cruise control was set at 115 km/hr (an under bridge speed check readout was 108 km/hr).
60-50 was fuel economy in km/litre. Had been this way for the previous 20-60 period. (Is bottom scale in minutes?). It is dead straight because the computer averages out previous reading when you turn off engine.
50-40 was me slowing and fitting intake.
40-0 shows marked improvement in fuel economy. Same speed, same conditions etc.This will have to be confirmed in another test - not satisfied with this result yet.
Measurements were also recorded in intake duct just before the throttle with stormwater pipe cold air intake in place.
Pressures recorded:
110 km/hr cruise control on: +2.2 cm of water
throttle closed (rolling) at 100 km/hr: +4.0 cm of water
wide open throttle: - 20 cm of water
This is good news - there is positive pressure before the throttle during normal driving (better than a pod).
Discussion:
SS Inductions and Stormwater Intake
I classify these as the same and the discussion applies equally to both. Both have similar performance, advantages and disadvantages.
These type of intakes strangle the engine. The engine is just a big suction machine and can out suck both these little intakes (well actually it is more correct to say that the higher atmospheric pressure cannot force air into the low pressure cylinder quickly enough through these intakes).
When testing the SS induction unit with Chris Law the readings suddenly changed halfway through the test. We had to do the whole experiment again to get consistent readings. After we returned to the carpark Chris noticed the airbox lid had popped open again. This had provided an extra path for the air to get into the airbox and reduced the negative pressure in the airbox we were trying to record. We taped the airbox down and went out again. The early readings returned again exactly as before. Popping the airbox lid is not such a big deal - it only requires pressure - it doesn't indicate a huge swag of air pulsing through the air box and into the engine like some sort of ram air supercharger. With wide open throttle the lid is sucked down real tight by the engine - only on the overrun will the lid pop with the throttle closed. Removing the lid on the standard airbox is the only way the engine can get enough air with wide open throttle. The engine will take all the cold air the intake can deliver and then some more from the lid opening. Cracking the lid open is not enough. It has to be removed totally and the air filter secured (with tape?) so that it doesn't leak. A cold air intake like these with the lid off is as good as a pod for flow, better for temperature. The airbox lid clips off easily - look at it closely and you will see that the back hinges just clip out. If you really want to go, then take it off. With it off you also get that great induction sound roar - it's great! Of course taking it off introduces a bit of engine bay heat and negates any positive pressure while driving normally (still better than a pod though). It's a trade off - you want maximum acceleration and noise? - take it off. You want economy and quiet? - leave it on. Just remember that bolting that intake to the front of the airbox makes things worse for flow, not better. The only good thing about theses intakes is that they deliver a cool air flow to the filter, it is not enough though, the engine needs more. The SS induction unit was a bit disappointing, it looks great with that big inlet area and shiny black appearance but didn't perform as hoped. It is a definite improvement over the standard snorkel though - no doubt about that. The positive pressure rose with speed and kept on rising - but pressure isn't volume. We could have reduced the size of the intake piping and still got the same pressure - pressure is transferable with the throttle closed since hardly any air is moving through. Measuring the negative pressure under full throttle is the true test of airbox performance. The negative pressure was higher when accelerating through gears normally. The negative pressure never got lower the faster we went. We let it got to 160 km/hr in third under full throttle and still we had negative pressure in the airbox. The SS induction unit was never able to provide sufficient air to the engine no matter how fast we went. Perhaps it would over 200 km/hr? Hire you own runway and do the test - I would like to know as well! These comments apply equally to the stormwater pipe.
But there is more bad news. Every little bit of sand, grit and bug that enters the inlet will bounce along the piping and hit the the filter. This got so annoying for a Soarer owner (I forgot your name - who were you?) I met at the LAOR meet that he took it off and put it in his pool room in disgust. The airbox kept filling up with dirt and water (not much water) and bugs. On the way home during a 8 hour test session of the stormwater intake through all sorts of weather day and night I inspected the intake and the airbox. Sure enough there were numerous bugs wedged in the filter. There was sandy grit at the bottom of the airbox. Looks like no water made it up the sharp incline of the stormwater intake though which is a good thing. The airbox remained dry and any water that hit the inlet area drained out again. But cleaning bugs out of the filter and vacuuming sandy grit out of the airbox is no fun (worse than a pod).
The other thing is that the stormwater pipe is only suitable for a UZZ31, JZZ31 or UZZ30 really. It obscures the suspension fluid cooler on the UZZ32 and the intercooler on the the JZZ30.
The economy thing is intriguing though and worthy of a closer look. I don't think it can improve economy by 1km/litre - that's too much of an improvement despite what the computer said at the time.
But this did get me thinking, while we were at Horsham, I took off the intake duct between the Air Flow Meter and the throttle. I used the cordless drill in the boot to make a small hole in the duct just before the throttle. I plumbed in the manometer to this point and routed the tubes back into the passenger compartment. The air deflectors on my windows allow the window to be slightly open to allow the tube in and not get to much noise or buffeting.
I wanted to see what was happening pressure wise in front of the throttle inside the duct under normal driving conditions
Anyway the big surprise was that with the stormwater pipe in place there was never any negative pressure at the throttle! (a good thing). Cruise Control at 100 km/hr constant speed gave a steady positive pressure of +2.2 cm of water.i.e. as far as the engine was concerned there was no filter, no AFM, no nothing! No restriction at all anywhere, in fact there was positive pressure in front of the throttle! Throttle closed at 100 km/hr gave +4.0 cm of water So fitting a sealed cold air intake (like SS or stormwater) negates the air filter, AFM and duct intake restrictions under normal driving conditions. Another plus. Of course taking the lid of the air box will reduce this effect(still better than a pod).
Headlight Scoop
This was bit of a let down. Looked great, nice big intake area, no bends, straight into box - should have been the biggest positive pressure but it wasn't. Why not? Two things come to mind. Firstly it might not have been sealed properly. Sealing is why I got different results the first time I tested the stormwater pipe. By sealing I mean where the scoop goes into the airbox - making this airtight. Secondly it might just be a lower pressure above the bumper than below the bumper. Remember that AutoSpeed article where they tested the different pressure areas on a LS400 with that pressure switch and buzzer? The scoop had less resistance than the other cold air intakes but still didn't provide enough air under full throttle. Again it seems you just cannot get enough air in that little standard hole at the front of the airbox.
So an airbox can be modified to flow as well as a pod, deliver more cold air to the engine than a pod, be more fuel efficient than a pod (bit of a trade off against flow though) but also deliver more dirt than a pod.
Recommendations:
SS Inductions (if you already have one): If you want max performance then take the airbox lid off and put it in the boot. It will flow as good as a pod and the cold air delivered by the scoop will keep things nice and cool. If you aren't a hoon then leave it as it is - it is way better than the snorkel and just might give you improved economy. Don't forget to clean out the bugs, sand and grit that will collect in the airbox! Stormwater inlet: Same as above (but contact me and compare notes!) Headlight Scoop: Don't bother - took me two cricket matches on the TV in the shed to make and a footy match to finish off - now it's going straight to the pool room!
What's next?
None of these intakes is the ultimate intake. They all had disadvantages
We want an intake that;
To get this there has to be a few basics first.
Well here are a few ideas to try;
Seal off the triangle area between the battery side high beam and headlight. You will need a gromit (rubber plug) to seal the wires going through this area. Perhaps a small piece of plywood cut to size and sealed with silastic will do the trick.
Next unscrew the plastic deflector in front of the radiator - not all the screws - just the ones at the front. Install spacers to leave the leading edge permanently down and acting as an air scoop. How big should the gap be? We will try a few different gaps and do some measurements. This is the basis of the primary air collection chamber. It is a sealed unit (or will be once we finish with the other headlight area). The advantages of using the whole chamber behind the license plate are:
Well that's the first part of the intake done - the second part is a little more tricky. It involves getting the air under the headlight and into the airbox. I have a few bits and pieces developed so far to do this. I will get some photos up of the bits soon. The first is a injected foam mold I made with headlight and airbox in place. This clearly shows how much room is available under the headlight and the maximum shape available to go from the headlight to the airbox. The headlight is a flat bottom and can be used as the roof of any inlet here. Also under the headlight you will notice the square section plastic cover over some wires and a lip in the metal opening - some more room is available here. Later when we move the fuse box to the other side of the engine bay and put the battery in the boot these wires will have to be moved anyway (but that comes much much later!). I have some 150 mm stormwater pipe and some 150 mm diam convoluted rubber ducting that isn't too rough on the inside that may be suitable for testing - later the foam mold can be used to whip up a fibreglass item if tests look positive. It just so happens that a 150 mm circle has the same diameter as the foam mold under the headlight. And don't forget the most important part - making the hole in the airbox bigger.