Wednesday 14th November 2001
Introduction:
I had had enough of measuring everything with the manometer - time for some on road performance testing to see if it made any difference. Not as accurate or as repeatable as manometer testing - but still that's what it's all about.
What type of testing to do though? I wanted something I could repeat consistently - nothing involving fancy take-off methods. In gear testing looked like the go. I decided on using the time it took to accelerate from 30 to 110 km/hr (19-68 mph)in 2nd gear. This should reduce the takeoff variations and give a reasonable length of time to record, reducing errors and inconsistencies in these two key areas. I also hope that others could also easily reproduce this test themselves for comparison.
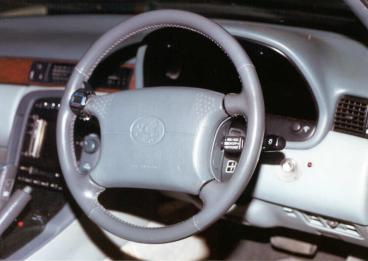
To keep the car in second gear under full acceleration move the ECT switch to POWER and select "2" on the trans. This slows the acceleration of the car giving a longer time spread to record.
The mass of my car with a full tank of fuel is 1780 kg - easily the heaviest Soarer in the World? Add in the mass of an average Aussie bloke (that'd be me) gives another 100 kg. Grand total of 1880 kg. Wow - that is a bucket load of Soarer to get moving. Converting this mass to a weight in lbs you have to times all the values by 2.2 roughly. This gives 3924 lbs. Add in the driver (220 lbs) gives a grand total of 4144 lbs! This is a standard Active with nothing extra in the boot. You can get your car weighed and converted to mass at any landscape supplies, or firewood place. Cost is $1.78.
Why all the mucking around with mass/weight? Mass is a constant and doesn't change. Weight is a force and varies with gravity. e.g. you weigh less on the moon but your mass is the same. Mass is measured in kg, weight in Newtons or lbs. Newtons (force) is mass (kg) times acceleration. For planet Earth times mass by 10 and you have Newtons. A jet fighter is quoted as having pounds thrust - a force. To say you weigh 100 kg is not correct, you weigh 220 lbs or your mass is 100kg. Common usage of course is weight for everything. In structural analysis if you mix up kg, lbs, mass and force you are history. The guys I used to work with measured Earth's gravity - can't even remember why - some sort of monitoring - anyway they wanted exact mass to measure exact force and determine gravity that effected their measurements - they were real fussy!
I found the flattest piece of road I could find with a 100 km/hr speed limit. It wasn't dead flat - slightly up hill (times were shorter coming the other way). I didn't mind though - I was more interested in the difference between the tests rather than the ultimate numbers. It was flat enough. I would do the test, pull over and record the time in my special Soarer Results Book, turn around and go back to the start and to it again. I strapped a stopwatch to the steering wheel that could be stopped and started with the left thumb.
Counting the speed increments 25, 26, 27, 28, 29 , you can anticipate when 30 is going to come up rather than waiting to see the 30 and then hitting the stopwatch.
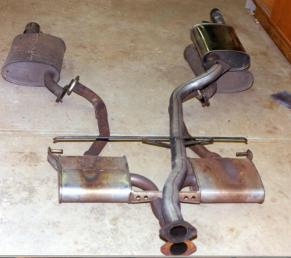
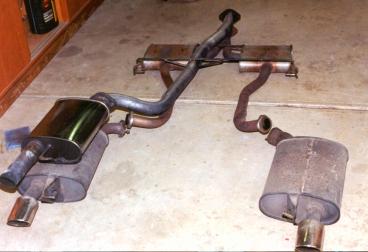
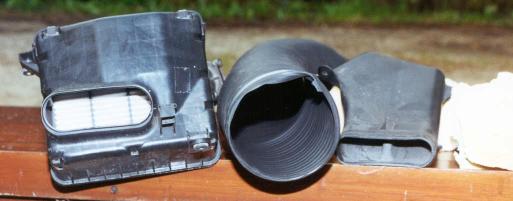
I wanted to see if replacing the four standard rear mufflers with a single 2.5 inch press bent pipe and single straight through muffler made any difference to performance. You can read more about the Lukey muffler ($179) on the Soarer Replacement Rear Muffler Page. Here is a photo of the standard rear mufflers and the single system I replaced it with. You can hear what this system sounded like on the Exhaust Sounds Page. It was real quiet. I also have some "in car" cruise and acceleration sounds coming up. In these photos I have laid the single exhaust on top of the original system for comparison. The single system is cheaper, lighter and common on many V8's. I already have plans for a dual system.
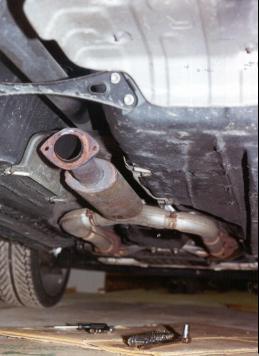
The other thing to note on my current exhaust is the front section. Here is a picture of the standard front section. You can see a schematic of the exhaust, mass and flow tests in the Exhaust pressure section. In this picture you can see the centre middle resonator. Mine don't look like this anymore! The standard cats are out of sight up near the engine. For compliance I had this resonator replaced with a 2.5 inch high flow cat. I didn't want the standard cats (which flow ok) replaced with el cheapo low flow cats. So I stuck in this high flow cat here for now that I could use later on. So at the moment my car has three cats! All the exhaust has to go through this single high flow cat - not ideal for performance but for now it will have to do.
So not only is my car extrodinarily heavy, it is an asthmatic trying to breathe through three cats.
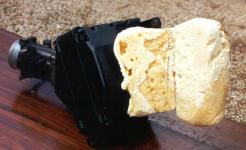
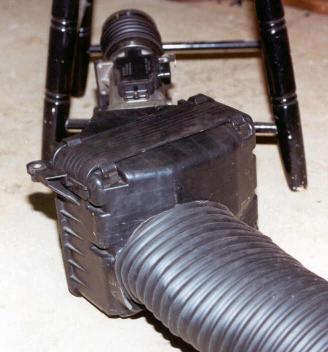
I had already determined that the standard hole in the airbox was too small. With the standard airbox in place, snorkel removed and headlight in place I want to determine exactly how big the space under the headlight was. I decided to try to fill the space with expanding foam from a can (expensive at $25 a can). But expanding foam is messy horrible stuff - you want to be careful. Filling a plastic bag under the headlight with the stuff won't work - it won't set (tried that). Using too much of the stuff at once instead of doing a small amount and letting it dry first like it says in the instructions won't work either (tried that too). So what to do? I tried lining the hole with paper - the foam expands and presses the paper out tight to the car - casting in sections was the go. The section that went over the front of the airbox was a bit tight to remove ( I used masking tape to protect the airbox from the sticky foam). Anyway after a lot mucking around and shaping I had a foam mold that went from the face of the airbox, under the headlight and down to the air intake in the bumper. Here is a picture of the bit that connects to the airbox and goes under the headlight.
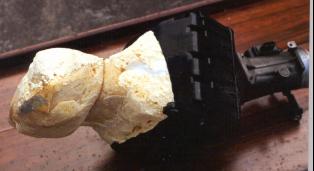

You can see here the line in the mold in the middle where I cut it open to get the minimum cross-section under the headlight. You can clearly see the bump in the mold where it goes over the rectangular black plastic wire cover under the headlight space.
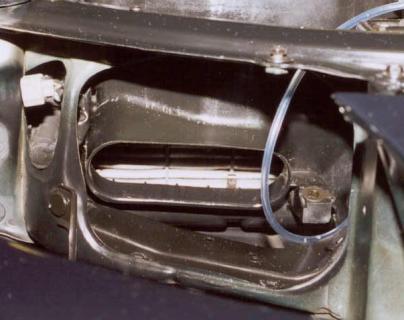
Here is the airbox hole from a different angle. At the bottom of the hole under the headlight on the bottom you can see the black plastic cover for the wiring - it takes up a bit of room, we could always move the wires above the intake rather than putting them below it to free up some more room at this bottleneck.
Once the mold was cut through the cross-section it can be measured and compared to the standard snorkel.
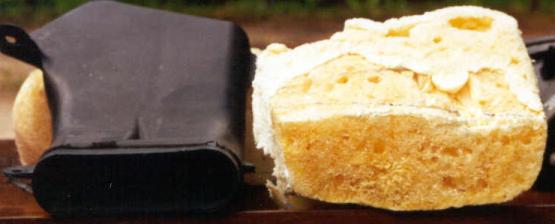
As you can see there is a substantially larger area available than the standard snorkel uses. I measured the circumference of the mold. It was the same as a 150mm (6 inch) circle. That means we could fit in some 150 mm duct or 150 mm stormwater pipe under the headlight. I went for the air delivery duct, wire spiral rubber hose - not too rough on inside and able to be squeezed and crushed into shape. I bought 1 m of the stuff for $38 from a specialist hose place.
That's it in the middle up the top. Naturally it wouldn't fit in the airbox unless you made the hole bigger. So out with the jigsaw and a cut an oval shape. I used a bent piece of wire to measure around the duct then traced on to the airbox.
The last thing to be tested was a new larger duct between the Air Flow Meter (AFM) and throttle. This new Big Duct (BFD) was 3.5 inch all the way and used a smooth rubber hose instead of the standard convoluted one.
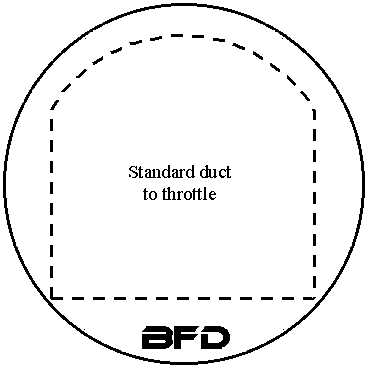
As you can see from the diagram the BFD is considerably larger than the standard intake duct. The standard duct is squared off at the sides to fit in the engine bay and to connect to the inlet resonator. Hot 4's had an article on Inlet Resonator Chambers - they tried different sizes on a 1.5 litre NA Mirage and noted differences of up to 4kW. Taking the inlet resonator off was bad, small one only good for top end, real big one gave varying results but wouldn't fit, the just right one was 900 cc. I took mine off, filled with water then poured it out into a jug, it was 1.2 litres. The chamber reduces noise and improves volumetric efficiency. So remember on previous page that Autospeed suggested the noise thing but but that I might try it without a resonator chamber if I was making it significantly larger. So I decided to go ahead and test the BFD without a resonator chamber - it would be difficult to fit one too.
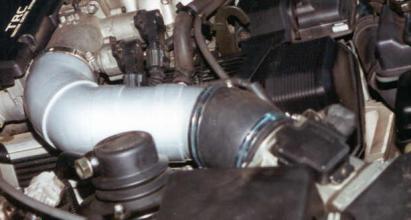
Also note here the two twin throttles - the first one is for the traction control. One throttle means no traction control. You can also see the tall Active suspension towers. TEMS suspension have hard plastic towers - not the soft rubber covers of the Active. Coil cars have no towers - plenty of room.
That's it for the intro - the test resuts are on the Acceleration Test Results page. (Which aren't finished yet - there will be a link on front page when done).