![]()
Saturday 22nd Sept. 2001
(this page is an early one - this ultimately lead to the BFI, Big Intake - which is a better intake than all of these - the best I have ever tested.)
This page details testing a cold air intake and standard filter for pressure loss at speed in inches of water.
I tested a homemade cold air intake and a new genuine air filter. Used a U-tube manometer to measure pressure loss at three different points in air inlet tract in inches of water. The points were between the throttle and Air Flow Meter, just after the air filter and just before the air filter.
In summary the standard paper filter flows well and the biggest improvement you can
make is to remove the intake snorkel.
A dirty filter had a pressure loss of 2 inches of water while a new one had a loss of 1
inch of water.
Homemade cold air intake developed a positive pressure of 2.5 inches of water at 100 kph.
Cold air intake was made from 100mm stormwater pipe - same circumference as the intake
snorkel. Used two 88 degree bends (the smoothest in the range) and a short piece of
straight pipe. Heated pipe to mould to shape.
Removing the headlight made hardly any difference.
Removing the intake snorkel made the biggest difference, although not as good the cold air
intake I made.
Testing was done on road at full throttle in 2nd gear. Measurements were taken at 3000,
4000, 5000 and 6000 rpm.
Also measured the pressure loss after the air flow meter - this is by far the biggest
restriction - but you can't do anything about it - don't even think about touching the
screen in the meter - it is an integral part of the measuring device (generates vortices
in air to by measured by downstream LED).
Was able to reduce the restrictions in the total air intake system by 30% by changing the
filter for a new one ($48) and fitting a homemade ram air cold air intake ($9).
This idea of measuring the intake at different points came from Autospeed.
http://www.autospeed.com/A_0629/page1.html
The original article from Autospeed. Five parts – all free. Read this for background info. A great site and a good read.
http://www.mkiv.com/main/index.html
Terrific Supra site. Go down to basic performance upgrades, then cone filter test results. Big difference between pod filters for flow and filtration.
http://www.fordmuscle.com/archives/2000/01/airfilters/index.shtml
Comparison of different types of filters including paper. Most paper filters rated between 80 % and 90% of the cotton gauze types (K&N type). Amount of dirt stopped by the filter, paper is in the 98-99% range when new, cotton gauze will best around 96%, while some foam filters are as bad as 50%.
Testing took over three hours and half a tank of fuel. My nephew, Steven, took the readings (while I yelled out the revs), didn’t complain and came up with plenty of good ideas and proper scientific procedures. Multiple runs were made.
Date: 14/7/2001 1:45 pm
Temperature: 14 degrees Celsius
Relative humidity: 77%
Pressure: 1017 millibars
300 m above sea level.
These figures were measured inside the airbox before the filter. They all show a negative pressure (suction) in inches of water (27.68 inches of water equal to just 1 psi).
Pressure Loss before filter in inches of water, full throttle, 2nd gear
rpm |
standard |
no snorkel |
snorkel & headlight removed |
$9 home made Ram Air intake (headlight replaced) |
3000 |
1.5 |
0 |
0.5 |
0.5 |
4000 |
2.5 |
1 |
0.5 |
0.5 |
5000 |
3.5 |
1.5 |
1.5 |
1 |
6000 |
3.5 |
1.5 |
1.5 |
1 |
Removing Snorkel gives good results. Don’t bother taking headlight out at the drags.
Positive pressure in airbox before filter at 100 kph with throttle closed in inches of water.
standard |
no snorkel |
snorkel & headlight removed |
$9 home made Ram Air intake (headlight replaced) |
|
| 100 kph | 0 | 0.25 | 0.25 | 2.5 |
El cheapo stormwater inlet gives good pressure. This is the first working prototype – will try others to see how high I can get the pressure. Will post photos of intake soon.
Pressure loss measured across air filter with standard system in place
rpm |
Dirty paper filter |
Before filter |
Pressure loss |
3000 |
1.5 |
1.5 |
0 |
4000 |
3.5 |
2.5 |
1 |
5000 |
5.5 |
3.5 |
2 |
6000 |
5.5 |
3.5 |
2 |
Even a dirty filter has a maximum pressure drop of 2inches – not bad. Will post photo of dirty/new for comparison.
Pressure loss measured across air filter with standard system in place
rpm |
New genuine paper filter |
Before filter |
Pressure loss |
3000 |
1.5 |
1.5 |
0 |
4000 |
2.5 |
2.5 |
1 |
5000 |
4.5 |
3.5 |
1 |
6000 |
4.5 |
3.5 |
1 |
With a maximum pressure drop of only 1 inch of water for a new filter it is hard to justify a "high flow" after market filter that does not filter as well as the standard item. I will definitely be keeping my standard filter and box – hard to beat.
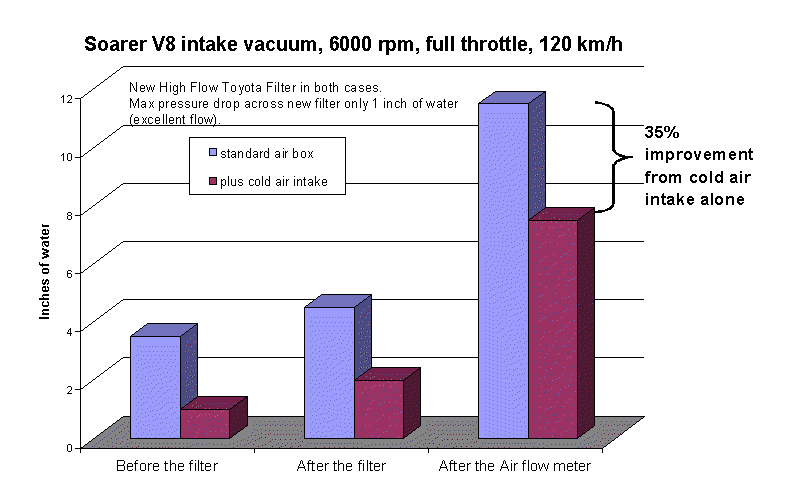
Pressure loss measured for whole system (between AFM and throttle)
rpm |
Standard system, dirty filter |
New filter, Ram air intake |
Improvement |
% improvement |
3000 |
3.5 |
2.5 |
1 |
29 |
4000 |
7.5 |
5.5 |
2 |
27 |
5000 |
10.5 |
8.5 |
2 |
19 |
6000 |
12.5 |
7.5 |
5 |
40 |
If any one has one of the fancy after market cold air intakes I would be interested to see how they measure up.
I made a U-tube manometer out of 5 metres of 5mm clear plastic tube (70 cents/m at hardware store). Found a 30 inch long piece of timber (20 is fine) and three inches wide out in the backyard.
Mark off inches on timber from say 1 to 20.
Attach one end of clear tube to timber in "U" shape. One end stays open just above timber, the other end goes out the car window, in the bonnet and attaches to intake. I attached tube to timber using those white plastic holders for electrical cable that you nail to wood.
Suck some water and blue food colouring into tube. Suck on the long end, put short end in bottle or something. I kept on sucking and blowing J until the blue water was at the 10 inch mark in both tubes when at rest. This made measurements easier later on.
Drill 2.75mm hole in airbox ( I know it brings tears to the eyes – the irrigation dept also sells neat little caps to cover hole later – or use a grommet – pick a spot out of sight).
Insert a piece of 3mm clear plastic hose – it is a tight fit.
Connect 5mm hose to 3 mm hose – it slips right over.
If both tubes are at 10 inches of water when resting and the one connected to the intake goes up to 11, the one open to the air in the car will drop to 9 inches. They always go up or down the same amount on each side. So if one goes to 11 and the other drops to 9 then this is 2 inches of water.
You are now ready to measure suction and pressure.
This is what you should do:
Buy a genuine replacement air filter.
Remove the intake snorkel to the air box.
(To do this you have to remove the drivers side front wheel, the inner plastic guard,
remove the headlight and then remove the intake snorkel. Make sure you replace the plastic
inner guard otherwise you're engine bay will fill up with crud).
This won't make any difference:
Removing the headlight.
Replacing the standard filter with an aftermarket filter.
Independent Air Filter tests are never the same as the claims on the side of box you
buy them in.
This is a free article that yet again shows that a K&N drop in panel filter has ZERO
PERFORMANCE GAINS.
Autospeed WRX powerup
The only advantage listed is that is can be reused. It cost 3.5 times as much as a
standard filter though and has to be carefully cleaned every 5000km.
This site tests the amount of dirt going through a K&N filter compared to a standard
BMW one. As usual the K&N lets more dirt through than the standard filter.
BMW K&N
dirt test
So if you went into a shop and on the side of the aftermarket air filter package was the
following:
"No Performance Gain!
Lets more dirt in!
Costs 3 times more!"
Would you buy it? Probably not. So do yourself a favour. Go down to the Toyota dealer and
get yourself a standard air filter:
Here's the part number:
17801-46060
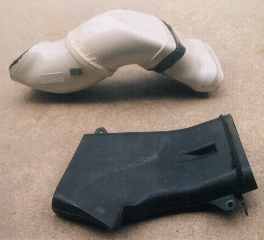
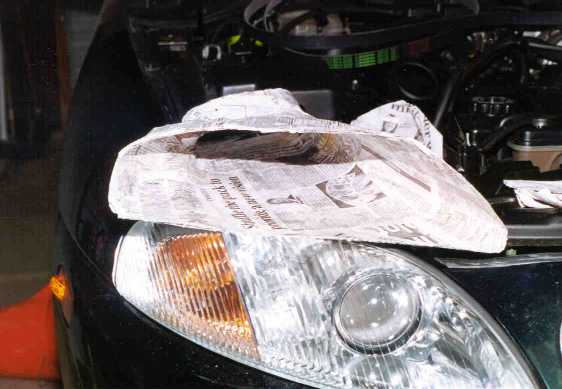
Here is the $9 cold air intake next to the standard intake snorkel. It worked great! I
will be changing the design for the second prototype. Might even paint it black! (of
course if you had a TT you would paint it blue to look like a TRUST one )
The 35% improvement to the intake system with a cold air intake is best represented by
this graph:
The El cheapo cold air prototype generated 2.5 inches of positive pressure at 100
km/hr. I read some of the racing V8 guys get up to 7.5 inches of positive pressure - don't
know at what speed though. Next step is to replace headlight with a scoop to see high I
can get the pressure at 100 km/hr. This headlight scoop will give maximum intake area and
minimum air flow losses (small k value)into airbox. I will use the results from the
headlight scoop to measure efficiency of future cold air intakes. We are limited by the
small area under the headlight to get air in. I was thinking of using a plastic bag and
some of that expanding foam in a can to make a mold for this critical bottleneck.
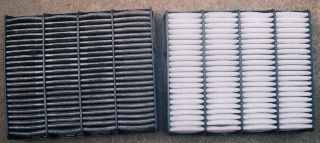
Here is the nice 'n' dirty old filter compared to the new one. Age unknown. The old filter
has stopped a lot of dirt entering the engine by the look of it. I had the old engine oil
analysed by the Castrol lab. The Silicon/Aluminium ratio indicates very low dirt entry
into the motor. This is a good indicator of how efficiently the filter is doing its job.
In fact all the tests came up trumps - I had no history on the old oil so its good to know
that everything is ok. I will get oil tested every 5000km - the trends are the most
important things. With big earthmoving equipment oil analysis is standard procedure.
Doesn't cost much either.
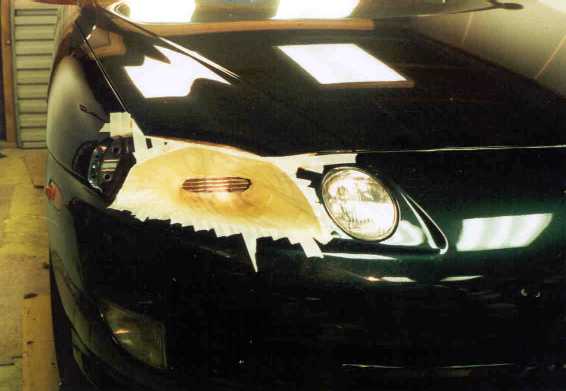
Trackday ram air intake. While watching the cricket in the shed last night I started
making a mold for a headlight replacing scoop. The headlight was out and the airbox was in
but I was having difficulty making a mold for a scoop. Tried a few things and ended up
putting strips of masking tape from inside the airbox inlet out to the bumper, bonnet and
headlight surround. So now have a relatively smooth transition from headlight surround to
airbox inlet. Looks ok so far. Great big air collection area going straight into the
airbox. Part of me wants to fiberglass it but another part of my brain is telling me to
"ease up, you'll only make a mess, paper mache and some water proof paint will
do".
At least that way if I do stuff it up I can still fill it with lollies, hang it from the
roof and get the kids from next door to bash it with a stick!
The mold looked like this;
The first paper mache scoop looked like this;
Why bother? I wanted to test some cold air intakes, but against what? Sure I could test against the standard system but when would I know that the intake was as good as it could get? By testing this one I will have an upper limit for flow with the standard system being the lower limit.
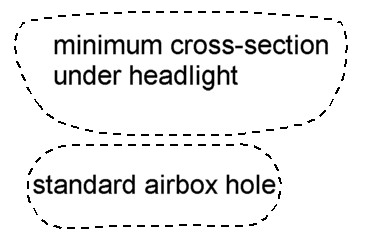
The inlet to the airbox is too small. The space under the headlight is a bottleneck.
While the headlight was in place I filled the cavity with expanding foam. Once this had
set I removed the headlight and had a nice mold. I then cut across the mold through the
minimum cross-section between the headlight and the metal panel beneath. This is the
maximum cross-section available to get air through.
I then compared this maximum available area with the current hole in the airbox. It was
50% bigger!! 50% bigger area with same velocity means 50% bigger flow (Q=VA, or
Flow=velocity times area). So the next air intake will be 50% bigger under the headlight,
and the hole in the airbox will be bigger again (nice smooth venturi effect after
headlight). Other projects on boil are a 3.5 inch mandrel bent polished intake pipe (9.6
inches square versus current 7.1 square inches - 36% bigger) and smooth connector to
replace corrugated rubber hose between AFM and intake pipe.
This is not a scale diagram. Use your own intake snorkel to scale it. I measured the circumference of this minimum cross - section and it was very close to that of a 150mm diam. stormwater pipe. I'm going down to the local hardware shop to buy 0.5 m of the stuff. Then I will fill it with cotton rags to stop it wrinkling when I heat it and try to squeeze it under the headlight. Then I will be time to cut a larger hole in the airbox to fit the other end of it - the airbox hole is too small. May also be able to use smooth bore (relatively) duct work of same diameter - save a lot of mucking around heating stormwater plastic pipe.
Next update is injected foam pictures, airbox hole modifications, venturi calcs. thru' sub-headlight restriction and on-road performance testing.
BFD (Big Duct) is a replacement for the standard V8 intake duct between AFM and throttle. The standard duct is squared off to plumb into the resonant chamber (reduces noise). The BFD is the same diameter as the AFM and reduces down to the throttle body at that connection. The convoluted rubber connector between AFM and standard duct also needs to be replaced with a larger 3.5 inch smooth wall rubber pipe. The BFD combined with the BFI (Big Intake) results in a BFPI (Big Performance Increase). The BFD is available in a chrome finish with BFD engraved on it or in a black powder coat finish for that sleeper look. I asked AutoSpeed editor Julian Edgar about the chamber "The devices are resonant chambers, forming part of the tuned intake system prior to the throttle butterfly. In addition to aiding volumetric efficiency (i.e. breathing) they are also sometimes used to reduce intake noise. If you are replacing the duct into which a resonant chamber is connected with a pipe size much larger than the original, we wouldn't bother reconnecting the chamber."
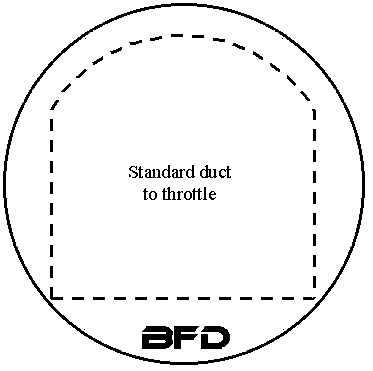
Looks like 3.5 inch mandrel bent polished stainless steel will be the go. Dearer than mild steel but saves on chrome and looks a bit better. Can't get the whole made from 1 pipe - will have to be a 90 degree bend, a small straight bit and a 45 degree bend. This will be a direct bolt on replacement for the standard duct. The convoluted rubber connector will be replaced with a silicon smooth bore 88 mm internal diameter rubber hose.
Of course you should construct your own out of 90 mm stormwater pipe and some suitable 90 degree and straight through silicon rubber hose and test it yourself using your own u-tube manometer.( which I will also be doing- results posted later.
Quotes for a stainless steel duct were about $200. But couldn't get a 90 degree mandrel bend with a radius small enough to fit inside the active suspension tower. 90 mm PVC stormwater pipe is the cheapest way to replace the duct. Two 45 degree bends have a smoother radius than one 90 degree bend and still fit nicely. 90mm (3.5 inch) rubber hose is hard to get with a smooth bore. I did get some high pressure suction hose but it is way too stiff and very heavy. Even 90 mm radiator hose is hard to get and relatively expensive - $38 for a 90 degree bend with clamps. Two 45 male-female bends, one 22 degree M-F bend, a few inches of 90 mm pipe, and a short length of 90mm rubber radiator hose should do the trick. Sometimes the radiator hose is a minimum of 1m long at $62 - a better bet is a 80mm standard rubber hose joiner from hardware store in stormwater pipe section- $20 with 2 clamps - heat in boiling water then squeeze on to AFM and male end of 22 degree bend. The two 45 degree bends are $1.20 and the 22 degree bend is $3.20. The M-F 45 degree bend fits onto the throttle body using the rubber ring from the standard intake duct - no problems there. Including the plumbers 80mm rubber hose gives a much larger intake duct for about $25. No testing done yet. Will post a couple of pics and do some on road testing to see if it is worth it.
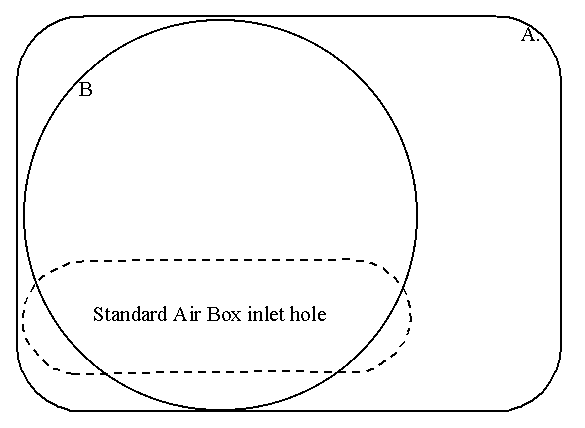
A - the outline the injected foam mold up against the airbox. This is the maximum size hole in the airbox that still flows nicely under the headlight.
B - this is 150 mm diam. pipe. Same size circumference as the minimum cross-section under headlight. This size pipe will crush to fit under headlight.
The standard airbox hole is a restriction and has to be enlarged. If your Soarer breathes through the standard airbox hole you are losing horsepower - the biggest ramair cold intake in the world will not overcome this restriction. On full throttle the engine is always out sucking any ram air device.
You can use 150mm (6inch) stormwater pipe or rubber ducting with a wire helix running through it. I have got both and will report back later. Let me know if you try anything yourself.
This counter is not used for any admin. purpose and is reflective of the total number of visits ever!